


Contents
To prevent water from the roof from washing away the foundation, a drainage system is made. There are they from different materials, more or less expensive, but in general, the costs are solid. You can save a little if you collect the drain with your own hands. About the features and order of installation and will be discussed further.
Types of drainage systems
The most famous and common weirs for the roof are made of galvanized metal. Although they are not as attractive as more modern options, they are reliable and inexpensive. And this is important. What else is good – if you have the skill of a tinsmith or simply having “straight” hands, you can make a drain from galvanization with your own hands.

If we talk about other metal systems, then two of them belong to the elite category – copper and from an alloy of zinc and titanium. They are certainly durable, but the price is very high. There is a more democratic option – metal gutter systems with polymer coating. At a price they are quite affordable, in appearance – you can’t find fault, in terms of durability – it depends on the manufacturer. If the technology is followed, they will serve for many years.
There is another type of drainage from the roof – from polymers. They normally tolerate ultraviolet, frost and heat, are highly durable, and look good. The disadvantage can be considered a rather high price, especially of European manufacturers. However, there are good options in the inexpensive category.
Composition of drainage systems
Gutters are located under the roof overhang. They are mounted on special brackets that hold the system. Since the storm drain is located around the entire perimeter of the roof, there are corners – internal and external. All these elements must be tightly connected. For this there are connectors with rubber seals. Connectors are often considered superfluous (they are just expensive). Then the gutters are overlapped with an overlap of at least 30 cm, connected with self-tapping screws.
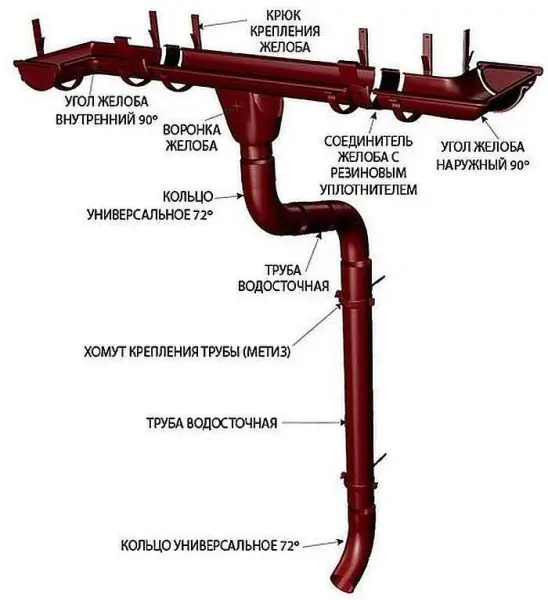
To drain water, holes are made in the gutter into which funnels are inserted. Downspouts are attached to the funnels. If the roof overhang is large, the pipe is made curved – in order to bring it closer to the wall of the house and fix it there. For turns there are maple or universal rings (some manufacturers). The downpipe is attached to the wall of the house using special clamps that have the same color as the entire system.
From all these elements, a system of the required configuration is assembled. If you decide to buy ready-made elements, and then assemble the gutter with your own hands, the best solution is to have a house plan with dimensions on hand. According to it, you will quickly determine the composition of the system and calculate the required number of elements.
Do-it-yourself drain: installation features
Most questions arise regarding the fastening of brackets for the drain. It must be said right away that they are installed taking into account the fact that the gutters should have a slight slope towards the funnels. The minimum recommended slope is 3 mm. If you want the water to drain faster, you can make it larger – up to 10 mm.
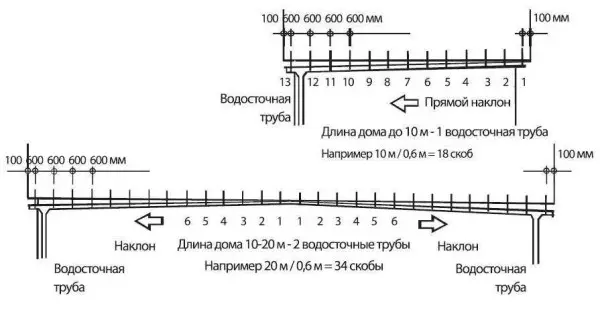
With a roof gable length of less than 10 meters, the slope is made to one side. If more, there are options:
- put an additional funnel (and downpipe) in the middle and form a drain to it;
- the gutter in the middle of the pediment has its highest point and slopes from the middle to both sides.
When installing a drain with your own hands, they usually do this:
- Nail the bracket at the highest point. The lowest one is nailed – taking into account the planned slope.
- A twine is stretched between them, along which all the other stops are attached.
One recommendation – before forming the slope, check the horizontalness of the line you are targeting. Usually this is either a frontal (wind) board. Unfortunately, it is not always perfectly level. So check the verticality, and preferably with a hydraulic level or a level, in extreme cases, a bubble one is also suitable, but of great length – at least a meter. For shorter ones at longer lengths, you will not be able to navigate.
Number of brackets and methods of their fastening
The number of brackets for installing a drain is considered simple: the distance between two adjacent ones should be 50-60 cm. Divide the total length of the wall by this distance. We add one to the resulting figure (extreme holder) and get the required amount for one wall. Similarly, the amount is calculated for the remaining walls of the building. If it has a non-linear shape, you will have to count by the piece: all its corner elements must be supported on both sides.
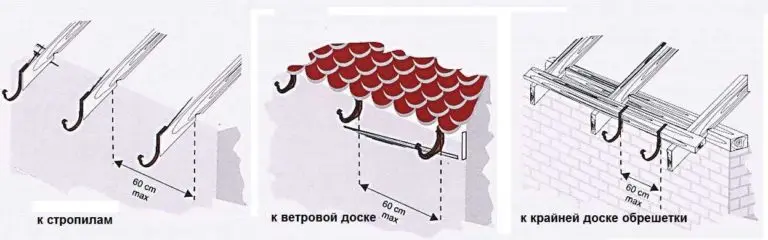
Now directly about the methods of fastening the brackets. There are three possibilities:
- Attach to roof rafters. The option is good if the roofing material has not yet been laid – there are no problems with fasteners.
- Install on a windboard. If plastic ebbs are chosen, this is the only option. In other systems – one of the possible.
- To the extreme board of the batten or flooring under the roofing material (if it is solid). This method is also used until the moment they started laying the roofing material.


Roofing material should not protrude more than half of the gutter
Once again, we draw attention to the fact that the brackets are nailed, taking into account the slope created. If they are made of metal, they are bent using improvised means or a special tool – a hook bender (sold in the same place as drains). In this case, the gutter must be positioned so that the roofing material ends before reaching half of it. And it is better that the edge of the roofing material is in the range of 1/2 – 1/3 of the width of the drain. So most of the gutter “catches” water, which is important during heavy rains.
At what level to mount
Now about how high to raise the gutter to the roofing material. If there is little snow in your region, or the roof has a large angle of inclination, so that snow does not accumulate on it, you don’t have to worry too much and mount it where you like. Otherwise, it is necessary to lower the system, so that when the snow melts, the drain does not “come down”.
In the figure, the approximate trajectory of the melting snow is indicated by a dotted line. The far edge of the gutter should not intersect with it. By the way, it should be a couple of centimeters lower than the one located closer to the house.
If it is not possible to lower the gutter below, it will be necessary to install snow retainers on the roof. They prevent massive snowfall. The snow melts little by little, and comes off in small fragments without harming the storm drain.
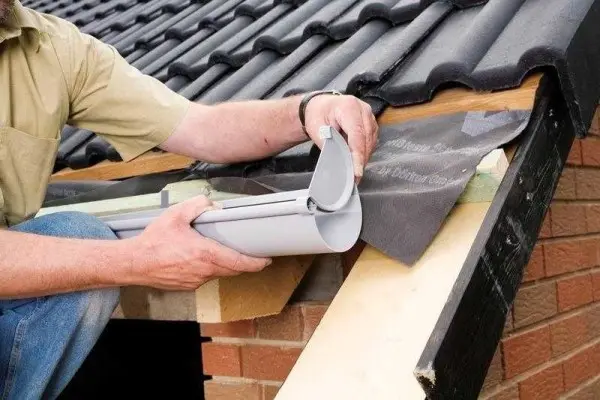
Gutter installation
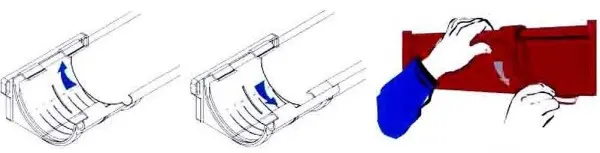
Gutters are laid in fixed brackets. There are two systems with different sequence of actions. The first has a specially molded groove on the edge of the gutter. The ends of the brackets are threaded into this groove, then the drain is screwed into place, secured with special tabs on the brackets. If you look at the photo, it will become clearer.

In the second system, installation begins from the side of the gable board. The far edge of the gutter is inserted into the locks located there, then alternately pressed into the locks on the front of the brackets.
Two fragments must be connected with a special connecting element with rubber seals. But their cost is quite high, so two gutters are often simply overlapped with a 30 cm approach. When choosing this method, make sure that the overlap is located along the water flow.
For greater tightness, a strip of rubber can be laid between the two fragments, and they can be connected with ordinary self-tapping screws (or with washers and rubber gaskets). After installation, the edges of the gutter are closed with plugs.
Do-it-yourself installation of a drain: fastening funnels
Having assembled and installed the gutter on the brackets, the installation of the drain continues with the installation of funnels. They are placed in the lowest areas. If the funnels are located close to the corners, stepping back from the edge of about 20 cm, a hole is cut with a hand saw. It is better not to use a jigsaw or grinder – it is likely that your cutout will be too large.
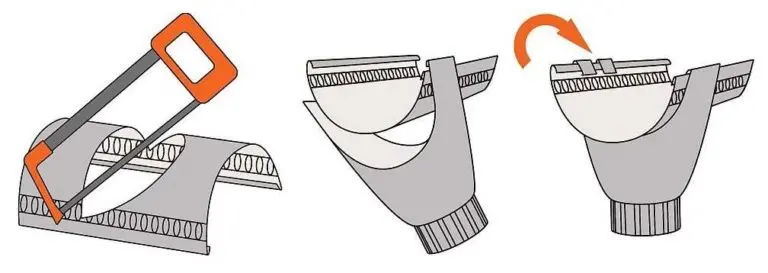
A funnel is attached to this cutout. It is fixed with a special hook on the edge, which is hooked to the outer cut of the gutter. Then it starts up to the second edge and is fixed there with special clamps.
Installation of downpipes
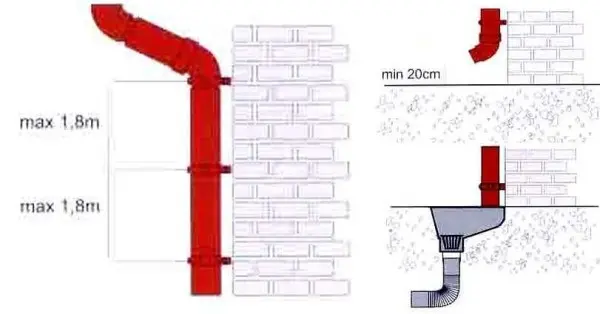
Drain pipes are attached to the installed funnels. If the roof overhang is large, a rotary element is attached directly to the funnel, which allows you to bring the pipes closer to the wall and fix them there. For fastening there are special clamps, painted in the same color as the entire system. They are of different designs, but basically they have a latch so that they can be dismantled without removing the screws that fasten the pipe to the wall.
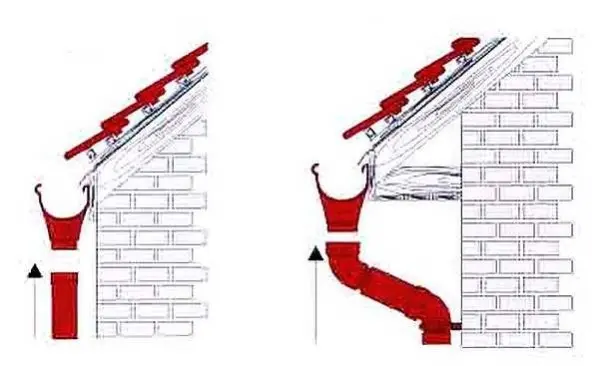
Clamps are installed at a distance of at least 1,8-2 m from each other. At the bottom, the drain can be brought directly into the drainage system (if it is located nearby). If just a blind area is made around the foundation, the drain pipe ends with a rotary element that diverts water from the foundation to a distance of at least 20 cm.
In principle, a do-it-yourself drain is installed, but there is one more detail that will make operation much easier. A metal (preferably stainless) mesh is laid on the gutter. It prevents leaves and other large debris from entering the system.
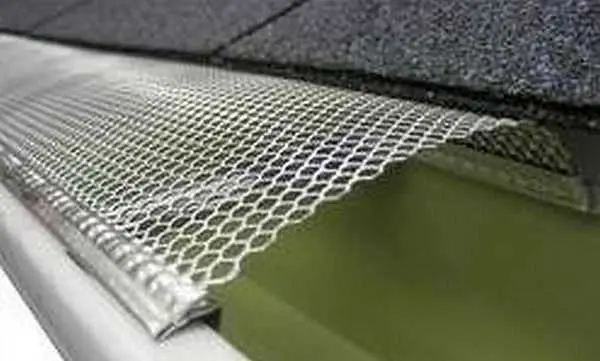
Installing a grid will allow less frequent maintenance of the system. This is especially true in tall buildings.
We make a drain with our own hands: budget options
Ready-made drainage systems are good, but not cheap. What to do if drainage needs to be done in the country and spend a minimum for this? There are several very affordable options. The first is to make a drain from plastic sewer pipes. Take pipes of large diameter (110 mm and more), good quality with a thick wall, cut them in half and use them as gutters. As downpipes, you can use the same diameter or a little less. Brackets are more convenient to buy ready-made, but in principle, you can do it yourself.
An even more budget option is downpipes made from plastic bottles. The gutter of them cannot be made normal, but the funnels of the pipe work normally.