


Contents
Paths are a necessary element of a country house. For their manufacture, different materials are used. The use of concrete will make garden paths reliable and durable. Each summer resident without much effort will build concrete paths in the country with their own hands.
Advantages and disadvantages
The manufacture of concrete paths has positive and negative sides.

Let’s look at the benefits first:
- Ease of arranging paths compared to similar quality paved materials.
- The composition of the concrete solution includes materials that can be purchased at a low price.
- The durability and reliability of the tracks allows you to keep their intended purpose for 20-30 years.
- When using special building additives, the paths become frost-resistant, which increases the service life.
- Moisture-proof properties, which is especially appropriate for close occurrence of groundwater.
- In the process of pouring concrete, you can realize original ideas for decorating garden paths.
Paths made of concrete have minor drawbacks:
- High labor intensity of preparatory work, especially when erecting formwork.
- Great dependence on weather conditions when pouring tracks. Precipitation even a few days after the completion of work can affect the life of the paths.
- When the ground moves, cracks appear on the surface.
- The quality of manual mixing of concrete may be insufficient. For such work, it would be advisable to use a concrete mixer or other devices.
- The possibility of transferring the finished track is excluded.
Video “Do-it-yourself concrete path for the garden”
From this video you will learn how to make a quality garden path with your own hands.
Basic building rules
For the reliability of garden paths, it is necessary to follow a clear sequence during construction and perform the work correctly. Making tracks will require going through the following steps:
- design work;
- territory marking;
- excavation of soil;
- formwork installation;
- the device of the underlying layer;
- reinforcement manufacturing;
- solution pouring.
DIY construction
To perform the work, sand, cement, crushed stone and a metal mesh for reinforcement will be required. From the tools you need to prepare:
- several different shovels;
- a set of carpenter’s tools;
- measuring devices;
- drill with a special nozzle or concrete mixer;
- craftsman, ironer.
Site marking and soil preparation
Using a step-by-step methodology, we will consider all the stages of the work:
- First of all, you need to complete a project in which the tracks will be drawn and their purpose indicated. For the central passage, a width of 1,5–2 m is taken, the remaining paths will have a size of 0,8–1 m. The need for concreting passages between the beds will be limited to a width of 40–50 cm.
- With the help of a rope and pegs, you need to mark the future tracks. The width of the planned lines is made 10-15 cm larger – to install the formwork. All obstacles that arise on the marking path must be bypassed, while maintaining the transverse size of the path.
- We dig the soil inside the markings with a shovel – 15 cm deep. If the soil is sandy, then you can dig no deeper than 12 cm.
Decking
For the manufacture of formwork, boards of small thickness (2-5 cm) will be needed. The width of these wooden slats should be no less than the height of future paths (15–20 cm). We equip straight sections with the help of such bars, and plywood or other similar flexible material is used for turns.
Adhere to the following algorithm of actions:
- Formwork boards must be knocked down with the help of additional rails, which are located on the outside of the structure.
- Next, the beam is installed along the contours of the track. The height of the upper plane of the rails should be 3–5 cm above the ground and correspond to the project.
- Smooth forms of rounding must be made in place, using sand filling.
- After installing the longitudinal boards, they are fixed with homemade spacers 2-3 cm above the level of the paths.
Pillow
The bottom of the resulting trench is covered with agrofiber or roofing material. Then they fall asleep with fine gravel and sand 3–5 cm thick. The underlying layer must be moistened and compacted. To prevent the track from cracking during seasonal temperature fluctuations, every 2–3 m it is necessary to install transverse dividing bars 15 mm thick. After concreting, these rails are removed.
Reinforcement
As a reinforced material, various metal products can be used: mesh, rods, profiles. This will reduce the cost of manufacturing reinforcement. It is important that everything is connected in one link that resists the breaking of the concrete path. The optimal material for performing such work would be a welded mesh with square cells 10×10 cm.

You must do the following:
- Prepare the required amount of reinforcing material.
- Cover the trench with nets or other metal structures at a height of 5–8 cm from the backfill layer. At the edges of the trench, 3–5 cm remains without reinforcement.
- Fasten all metal elements to each other and to the formwork to avoid displacement when pouring concrete.
Fill
After the completion of the preparatory work, we proceed to the final:
- Concrete preparation. It is necessary to prepare a mixture of cement, sand and gravel in a ratio of 1:3:1. Use cement grade M-400, and crushed stone – fine fraction. The specified ratio of the cement composition will allow the garden path to maintain its shape and properties for many years. To fill the top layer, you can use a ready-made mixture of sand concrete. Before purchasing such material, you must carefully read the instructions from the manufacturer, since existing brands have different purposes. The use of special additives will extend the life of concrete paths.
- After thoroughly mixing the solution to a creamy consistency, concrete can be poured into the trench. In accordance with the project, the required pouring height is maintained. It is desirable to make the central part of the track 2–3 mm higher. This will avoid the formation of puddles.
- Using a trowel, level the surface of the track in all its sections.
- Allow the solution to dry. To avoid cracks during the drying process, the flooded areas are covered with polyethylene for several days or more.
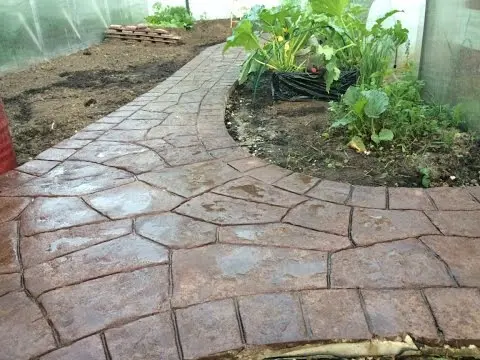
Decor
In order for the path to have an attractive appearance, it must be painted or decorated using unnecessary building materials.
Painting can be carried out during the pouring process. To do this, use only white cement while mixing the mixture. As a coloring element, it is better to add polyacrylic paints for outdoor use. With this method, the color will be expressive over the entire area of uXNUMXbuXNUMXbthe paths. You can paint the surface after the concrete has dried. In this case, the paint will be affected by temperature changes and precipitation.
Another equally interesting design method is laying mosaics from fragments of ceramic tiles, glass or natural stone. To perform such a decor, it is necessary to lay out patterns using cement mortar in the following days after pouring concrete.
Another decoration option is to apply a color pattern to the surface of the tracks.
To save the image for a long time, it is necessary to make shallow furrows the next day after concreting, which will become the contours of the future drawing. Then, after stirring small portions of the dye solution, fill these furrows with different colors and press down with a trowel.
Alternative
If you want to have a relief tropic in the garden, it is made from separate concrete slabs of various shapes. To do this, you can repair old wooden boxes and use them as shapes for future rectangular slabs. Or design an original stencil for making a separate section of the track. Such a stencil can be purchased at a specialized store.
Concrete walkways will give the suburban area an elegant look. Their production has a low cost, and decoration will emphasize the style of a residential building and its surrounding buildings.