


Contents
Modern built-up roofing has a service life of up to 25-30 years – current materials retain their properties over such a period of time. But this is subject to the competent installation of each of the layers. Errors are unacceptable, since there is no way to correct them. You will have to dismantle a piece of the roof if the errors are local or all if they are global. Probably for this reason, many homeowners prefer to make their own built-in roofing – do-it-yourself ones, as a rule, last longer without leaks.
The structure of materials for built-up roofing
Materials for built-up roofing have a multilayer structure. A binder is applied to the base from both sides, and a protective coating is applied to it. All these layers have several options. Their combinations give different properties and characteristics.
Base types
A significant part of the properties of the material is set by the base on which the binder is applied. If it can stretch, then the material for the built-up roof can also change its dimensions to a certain extent, if it does not tolerate deformations, then the material is torn. There are the following basics for built-up roofing:
- Roofing cardboard. Sufficiently durable and inexpensive base, popular due to its low price. On the basis of roofing cardboard, all varieties of roofing material are made. Therefore, when marking in the first position, they put the letter “P”, which denotes this material. This is a good choice for a temporary roof – the service life of the roofing material is up to 5 years. But the scope of roofing material is quite limited – it begins to burst and crumble at temperatures above +40°C and below -20°C. And this is its main disadvantage.
- asbestos paper. On this basis, Hydroizol is made. It is mainly used in the lining layer of a roofing cake as a waterproofing layer. It has a low price, but its service life is up to 5 years.
Designation of basic materials - Glass fiber. A strong base that is not easy to break. Materials based on fiberglass during roof movements can come off the surface, but are rarely torn. It is marked with the letter “C” (in the first position of the designation).
- Fiberglass. Non-woven fabric, medium strength, suitable for stable substrates where movement is unlikely. Fiberglass in the marking is displayed with the letter “X”.
- Polyester, Durable and elastic fabric. Polyester-based weld materials can stretch up to 30% of their original size without breaking their integrity. Designated by the letter “E” in the first position in the designation.
The most durable materials are made on the basis of polyester. Manufacturers say that these materials retain their properties for 25-30 years. So much built-up roofs can be operated without repair, however, with proper installation. The disadvantage of polyester-based weld materials is the high price at the time of the device. But you can save on repairs and replacements.
Types of binder
The binder also determines the set of properties of the material for the built-up roof, but no longer affects the strength, but the waterproofing properties and resistance to weathering. Also, this layer is responsible for the degree of adhesion (adhesion) with the base or underlying layer. There are the following types of binders:
- Bituminous.
- Based on tar.
- Bitumen-tar.
- Rubber-bitumen.
- Rubber-polymer.
- Polymer.
Characteristics of welded materials for roofing depends on the type of binder
The best characteristics of rubber-bitumen and bitumen-polymer compounds. They have a wide temperature range in which they can be used. When choosing materials for built-up roofing, be sure to pay attention to this parameter, because some of them tolerate high temperatures (up to +150 ° C), and some – low temperatures (up to -50 ° C). And you can’t mix them up.
appointment
Welded roofing, as a rule, is multi-layered, and materials for different layers must have different characteristics. Those below should provide waterproofing, sound absorption, and, if possible, have thermal insulation properties. These materials are called lining materials and when labeled, they are indicated by the letter “P” in the third position in the label.
The welded materials for the top layer of the roof must additionally have a high resistance of the surface to mechanical damage and weather influences. These materials are called “roofing” and in the abbreviation are denoted by the letter “K” in the third position.
Protective layers
Since the binder in the welded materials is sticky, it must be covered with something. This is done using stone chips of various sizes or plastic wrap. Sometimes foil (Folgoizol) is used as a protective layer. Such materials are used in countries with a hot climate. You need foil to lower the temperature – the lower layers heat up 15-20 ° C less than with conventional materials.
Stone chips (powdering) happens:
- Dust-like (P) and fine-grained (M). Used to prevent sticking of layers in a roll.
- Coarse-grained (K) or scaly-mica (H). It is used on roofing materials from the front side for protection against mechanical influences and protection from weather influences. In addition to these tasks, it also performs decorative functions – the crumb is painted in different colors.
If the surface is sprinkled with coarse-grained crumbs, this is the roofing (finishing) layer
Since the type of protective coating has a significant impact on the characteristics and scope of materials (fine-grained and dust-like are applied to lining materials on both sides), their designation is also in the marking – this is the second letter.
This is a summary of all the characteristics that you need to know when choosing a weld material. Before buying, be sure to read the description, study the scope and specifications.
The technology of laying a soft roof without fusing is described here.
Base requirements
Welded roll roofing is most often done on a reinforced concrete base, the joints between the slabs must be sealed with a solution of grade M150 and higher. Reasons may also be:
- Rigid mineral wool slabs (tensile strength not less than 0,06 MPa. If the roof is welded directly on them, the surface is preliminarily treated with hot roofing mastic with a consumption of at least 1,5 kg/m2.
- Thermal insulation made of monolithic lightweight concrete with aggregates such as perlite, vermiculite. Screed from a cement-sand mortar of grade not less than M150.
- Extruded polystyrene foam.
Raised roofing substrates can be rigid mineral wool mats or high density expanded polystyrene - Asphalt base, compressive strength not less than 0,8 MPa.
- Prefabricated screeds from flat asbestos-cement and glass-magnesium sheets, CSP (cement-bonded particle boards). The minimum thickness of the boards is 8 mm; they are laid in 2 layers with spaced seams. One seam is separated from the other by at least 50 cm. The layers are fastened to each other – in the center and along the perimeter, the type of fastener is riveted, it is possible to use self-tapping screws. When mounting on self-tapping screws, it is necessary to pre-drill holes, the diameter of which is 1-2 mm less than the diameter of the fastener. At least 300 fasteners are installed on one sheet of 150 * 14 cm.
- Filling of perlite and expanded clay, on top of which a cement-sand screed with a thickness of at least 50 mm is arranged. The screed must be reinforced with road metal mesh.
One of the ways to form a slope is expanded clay backfill.
If the built-up roof is flat, it is necessary to form a slope towards the drain or catchment funnels of at least 1,7%. This is usually done with a heater. Manufacturers of rolled welded materials produce insulation boards with a given slope. They are simply laid, observing the direction.
You can find bituminous shingle roofing here.
The composition of the roofing cake
When installing a pitched or flat welded roof, the cake is the same – with or without insulation, but it must have a vapor barrier layer. The material for the vapor barrier is selected for the roofing used, as well as the lining carpet is chosen for it.
It’s all about the compatibility of qualities and characteristics, therefore it is advisable to use all the elements of one manufacturer on the roof. Solid campaigns even have special tables according to which you can choose the required pie. One of the most famous manufacturers in Russia is TechnoNIKOL, their table is given below.
What’s under the roofing material
The vapor barrier protects the overlying layers of insulation from saturation with moisture, which is especially important when using stone wool as a heater. She is afraid of getting wet. With an increase in humidity, its heat-insulating properties are greatly reduced, and if it freezes when wet, then when defrosted, it will simply crumble into dust and your roof will become cold. Therefore, when laying the vapor barrier, special attention is paid to the tightness of the joints, the correct cutting of the passages.
When insulating a flat roof, one must remember the need to create a slope towards the drain or receiving funnels (at least 1.5%). The same slope is maintained when pouring the screed. Its minimum thickness is 5 cm, the concrete grade is not lower than M150. The screed that has gained strength (at least 28 days from the moment of pouring) is smeared with a bituminous primer, which ensures normal adhesion of the roofing cake to the screed.
On rigid stone wool slabs, fusing of materials without laying a screed is allowed. Then the surface of the insulation is smeared with a primer, and the layers of the welded roof are mounted on top.
But it is not always necessary to insulate the roof. In this case, there are fewer layers (see photo).
When constructing a pitched roof or a prefabricated screed (made of slabs and sheets), the roofing pie will be the same, only the vapor barrier layer is stuffed from the side of the room, the insulation is laid between the logs, and prefabricated screed sheets are attached to the logs on top (sheet thickness of at least 8 mm, laying in two layers with spaced seams).
Built-up roof device
The built-up roof will serve for a long time if its layers are laid according to all the rules. There are quite a lot of works, they are located in the article in order of priority.
Substrate preparation.
- All debris and dust is removed from the roof surface.
- Rust and other non-greasy stains are removed with abrasives.
- Grease stains remove part of the solution, leveling the resulting recess with patches of cement-sand mortar.
- If the surface is relatively flat (the difference is not more than 5 mm / sq. M along the slope of the roof and 10 mm / sq. M in the transverse direction), cracks and potholes are sealed with a cement-sand mortar. If the floor slab is uneven, it is poured with a leveling screed. For pouring, concrete grade not lower than M150 is used, the minimum thickness of the screed is 30 mm.
Cracks are first expanded, then filled with mortar - Vertical surfaces must be plastered or sheathed with DSP boards, flat asbestos sheets. If they have cracks and crevices, they are sealed with sealant or cement-sand mortar.
- Before laying the surface of the roof and vertical surfaces, treat with a bituminous primer (primer composition).
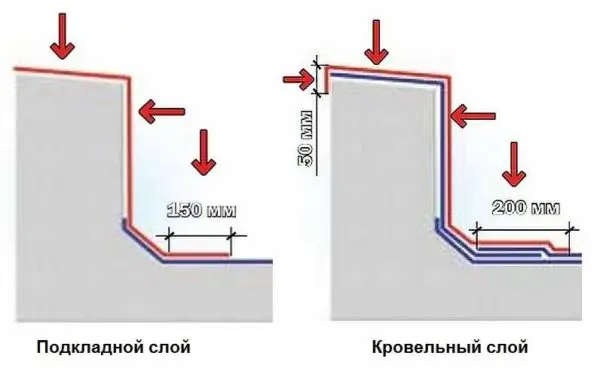
In places where roofs adjoin vertical surfaces, build-up roofing materials to a height of at least 10-15 cm (unless there are special recommendations). At the junction of the built-up roof to the walls of the heated premises (including chimney pipes and ventilation ducts), the entrance to the vertical wall must be at least 25 cm. This is necessary so that condensation does not form in the roofing pie.
Laying the vapor barrier
Bituminous weldable vapor barrier material can be installed using the fusing method, or it can be laid freely, but all joints must be fused.
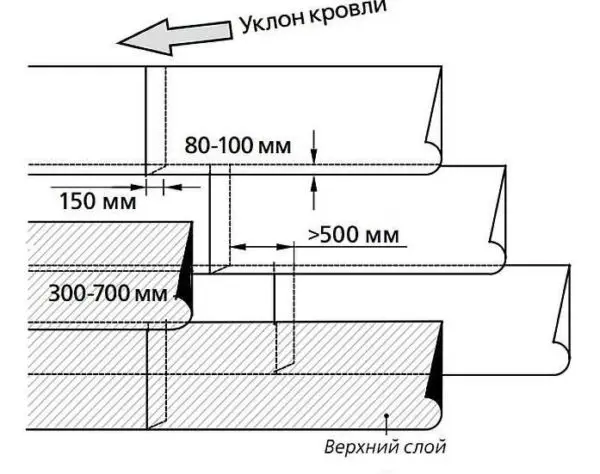
- The material is rolled out on the roof so that the side overlaps are 80-100 mm, the end overlaps (the joints of two rolls in one strip) are at least 150 mm.

Rules for laying rolls of built-up roofing - End overlaps on adjacent strips must be spaced at least 500 mm apart.
- When installing an insulated built-up roof, a vapor barrier is placed on the wall above the thermal insulation layer by 10 cm.
- The junctions with vertical surfaces are reinforced with an additional lining layer; it is laid on hay by 250 mm and so much 100 mm should lie on the roof.

After installing the vapor barrier
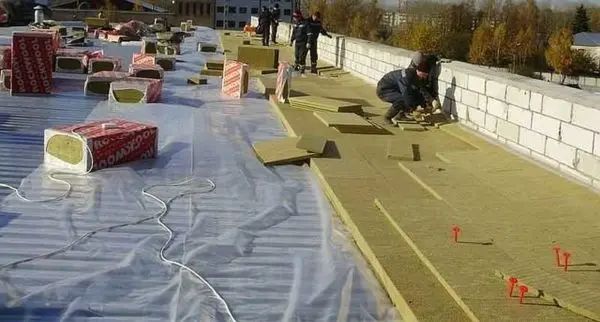
thermal insulation layer
Thermal insulation is laid on the finished vapor barrier layer. The surface must be absolutely dry and clean. The rules are:
- The plates are laid without a gap, tightly fitted to each other. If gaps larger than 5 mm are formed, they are filled with strips of heat-insulating material.
- When laying two words, the seams are laid apart.
- In order not to damage the laid insulation, paths are made of slab material (plywood, OSB, etc.) on its surface.
- They are fastened with special sharpened self-tapping screws with plastic caps instead of umbrellas.

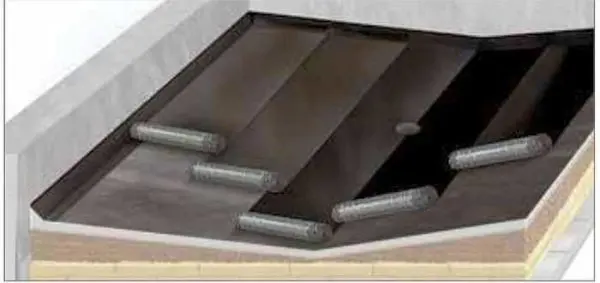
Laying thermal insulation in several layers occurs with offset seams - With the help of thermal insulation, a slope towards the drain is formed.
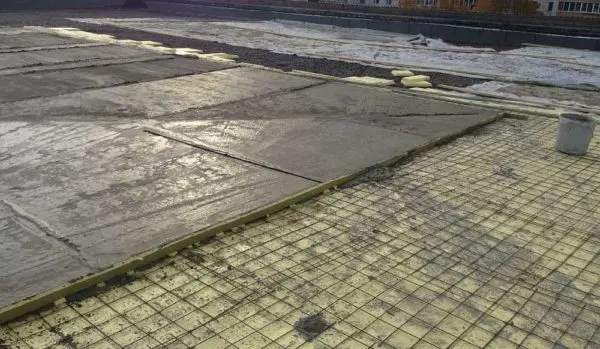
Screed device
A screed is poured over the insulation. When using rigid mineral wool slabs (compressive rigidity not less than 0,06 MPa), the built-up roof can be made directly on the insulation, without a screed device. But for greater reliability, it is better not to skip this stage. The order of work is as follows:
- A separating layer is laid on mineral wool or expanded polystyrene – roofing material or glassine.
- A metal wire mesh of at least 3 mm thickness is laid in increments of 150 * 150 mm.
- Fragments of the mesh are laid with an overlap of at least one cell (150 mm). In places of overlap, they are tied with knitting wire with a pitch of 300 mm.

The device of a coupler under a roof from the built-up materials - Guide rails are installed taking into account the formation of the slope.
- Concrete is poured between the slats. It is leveled with a rule, resting it on slats.
- Two days after pouring, the slats are removed, the resulting voids are filled with a cement-sand mortar.
The screed is left to gain strength. This takes an average of 28 days. To maintain the required level of humidity, immediately after laying, the screed is covered with plastic wrap, tarpaulin, burlap. During the first week, the surface is periodically wetted: at a high temperature several times a day, at a low temperature – once.
The concrete that has gained strength is treated with a primer (and the parapet too), wait until it dries (the time depends on the brand and weather). The fusing of roofing material on a primer layer that has not dried is prohibited.
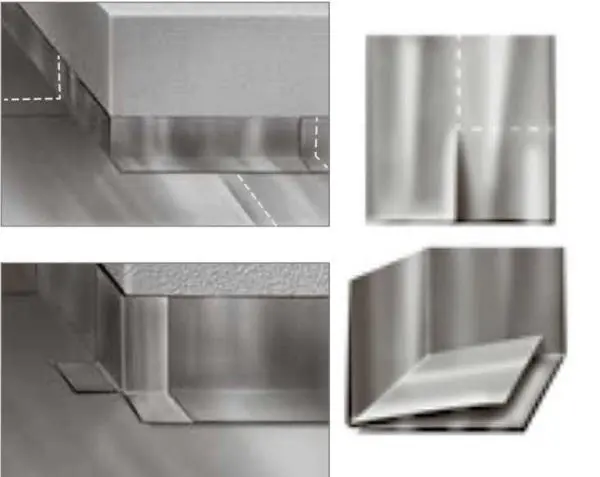
Adjacency to vertical surfaces: arrangement of sides, overlaps
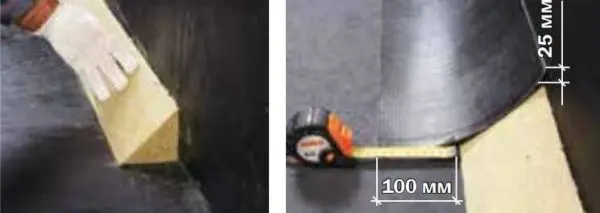
In places where the roof adjoins vertical surfaces, to ensure tightness, it is recommended to make a side with an angle of 45 °. You can make it:
- using a cement-sand mortar (grade M 150, dimensions 100 * 100 mm)
- by installing special fillets, which are produced by the same companies that produce materials for built-up roofing.
Fillets are installed on bituminous mastic, the side of the solution after setting the cement is coated with a primer.
The sides are covered with an additional layer of lining carpet of the Technoelast EPP type. A strip of such a width is cut from the roll so that at least 100 mm of material remains on the base of the roof and at least 25 mm is wound onto a vertical surface. Lateral overlap of strips – not less than 80 mm. The material of the additional carpet laid out along the perimeter is welded onto the sides over the entire width.
When laying the next layers (underlay and roofing), the lining layer is also first melted, then the main carpet is laid and melted, bringing it 80 mm higher than the side. The stripe width of the additional carpet depends on the layer.
Endova and horse
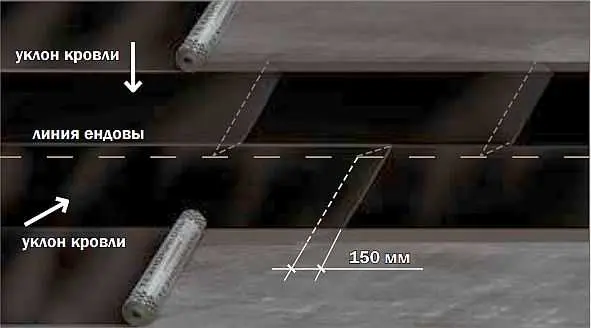
If a pitched built-up roof is being installed, an additional lining layer is laid on the ridge at the bend of the roof. Its width is 250 mm on each side. On complex roofs in the places of valleys, the lining layer must be at least 500 mm on both sides of the bend.
When laying on a ridge, the joints of the sheets are placed against the direction of the prevailing winds. The overlap of the panels is at least 80 mm, the joints must be fused. In the valley, if possible, the underlayment is laid in a single piece. If the length of the roll is not enough, rolling starts from the bottom, moving up. The junction is also necessarily melted.
Built-up roofing: material laying rules
First of all, you need to decide on the direction in which the rolls will roll out. On flat roofs, this is done along the long side of the roof. On sloping roofs, the direction depends on the magnitude of the angle:
- less than 15 ° – rolls across the slope (along the slope);
- more than 15 ° – along the slope.
Note! Laying different layers in a perpendicular direction is unacceptable. All layers of welded materials for the roof are laid in the same direction.
If there are several layers, the longitudinal seams of the layers are displaced by at least 300 mm. When laying, standard overlaps are also provided: side – 80-100 mm, end 150 mm.
Laying order
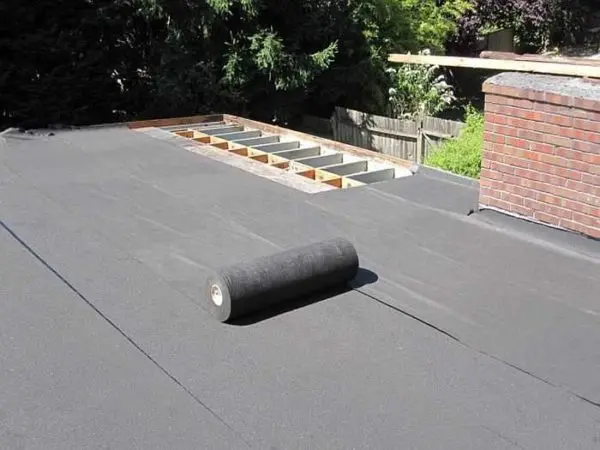
Start the installation of materials of the built-up roof from the lowest place. The roll is preliminarily rolled out, providing access to vertical surfaces (parapets, pipes, etc.). It is necessary to roll out without waves. So that the material does not move, when rolling, one side is pressed with something heavy (you can put an assistant). On the laid roll, mark the length, cut off the excess.

On flat roofs, the roll is rolled from the edges to the center. For convenience, you can use an iron pipe. With a slope of more than 8%, this option does not work. In this case, welding starts from the top, moving down. A piece 1,5-2 meters long is left unwelded. It is processed after the whole piece is glued.
In order to have fewer waves when rolling out the rolls, a couple of days before the start of installation they are placed “upright”. So they take a round shape, the material then lies flat.
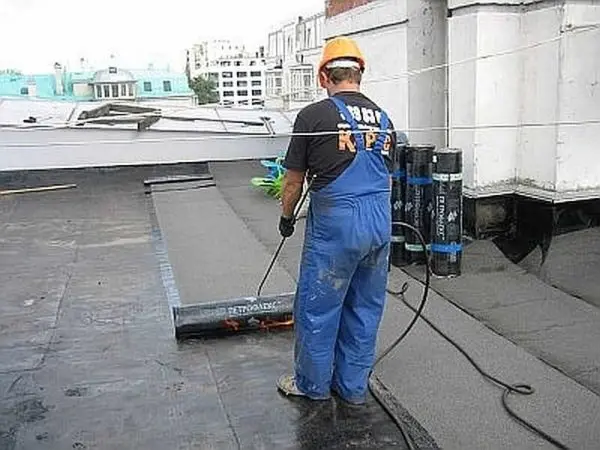
Fusion technology
Regardless of how the material is rolled, it is welded by rolling it “on itself”. So you can control the degree of heating of the bituminous layer: the whole picture is before your eyes. If you push the roll “from yourself”, the quality of the roofing will be very low and the roof will quickly leak.

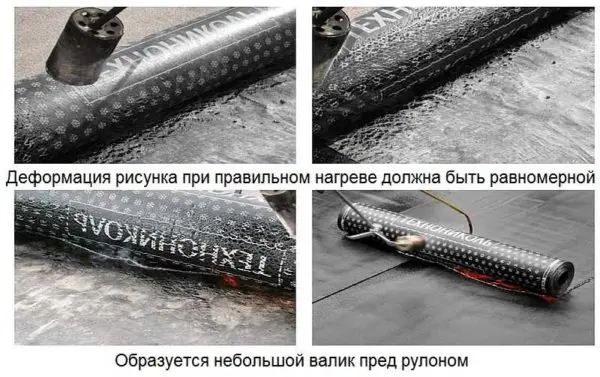
The movements of the burner are smooth and uniform. When laying the overlapping areas are heated additionally. In this case, the burner moves along a path in the form of the letter “G”. The burner is positioned so that both the base of the roof and the binder on the surface of the roll are heated at the same time. With proper heating, a small roll of molten bitumen forms in front of the roll.
When welding, it is necessary to ensure that the bitumen melts evenly, there are no “cold” zones or zones of local overheating. Some manufacturers (TechnoNIKOL) apply a pattern to the underside of the deposited roofing materials. It is easier to control the degree of bitumen heating using it – as soon as the pattern “floats”, you can roll out the roll and move on. If the bitumen is heated correctly, it flows out along the edges of the roll, leaving a strip about 25 mm in size. That is, an even seam of dark color is obtained along the edge.
Note! Walking on only the welded roof is impossible. The dressing is trampled into hot bitumen, which worsens its appearance and protective properties.
When laying the built-up roof in low areas, the corners of the rolls at the joints are cut by 45 °. This sets the right direction for the movement of water.
Sometimes, when laying the finishing layer of a built-up roof, it becomes necessary to weld the material over a coarse-grained or scaly topping. If you simply heat the material and stick it on the sprinkle, there is a high probability of leakage. In this case, it is necessary to preheat the surface of the material with dressing, drown it with a spatula in bitumen. After that, you can already reheat and glue.