Contents
Watering vegetation in the garden should be carried out regularly and in accordance with certain rules and methods. Habitual hoses and watering cans are completely unsuitable for high-quality irrigation of lawns, lawns or flower beds. Even watering from a garden hose with a special nozzle is difficult to achieve a uniform distribution of moisture over the entire area. The best solution in such a situation would be automatic watering of the lawn, which allows you to deliver the necessary amount of moisture to the plants at a certain time, taking into account the geometry of the site and the location of herbaceous vegetation and trees on it.
Description of the system
When installing an automatic lawn watering system, the plants will be moistened exactly in a given rhythm and at a strictly defined time. At the same time, if the installation included the use of special meteorological devices, then the operation of such a system will be adjusted in case of strong wind or rain.
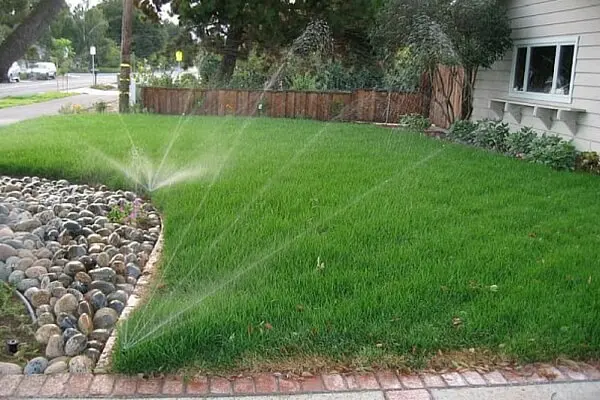
Automatic watering for its functioning does not require the presence of a person. Plants growing on the lawn will receive an optimal portion of moisture for their vital activity, and watering is done at a time of day when water drops on the leaves will not cause sunburn.
If the irrigated area has a large area, and the water source cannot provide its supply in the required volumes, the automatic system allows you to irrigate alternately in different allocated zones. Also, with proper design, the presence of large shrubs or trees in the irrigation zone, which can cause excessive wetting of the lawn in front of them, is taken into account.
A set of various components offered on the market today allows you to install a system for automatic irrigation with your own hands. At the same time, despite the abundance of structures used, the harmony of landscape design on the site will not be violated in any way. Programming irrigation at night will not create inconvenience for relaxing on the lawn, and guests can be surprised by the beauty of real rain.
Video “Feedback on the operation of the automatic irrigation system”
Natalia Kolomiets and Stefan Verstappen, participants of the Dachny Otvet program (NTV channel), share their impressions of the Rain Bird equipment they installed during filming.
What will you need?
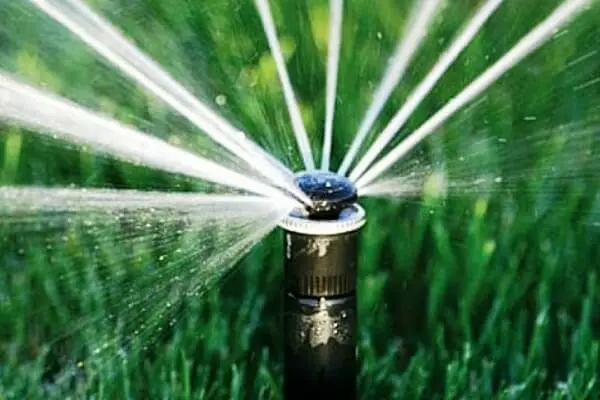
An automatic lawn irrigation system, when arranging it with your own hands, will require the purchase of such equipment and components as sprinklers, plastic pipes, electromagnetic and drainage valves, pressure regulators, a pumping station, controllers that control the operation, filters and fittings.
Since the system is installed for a long period of operation, all elements should be selected carefully, giving preference to well-known brands, especially if you intend to do everything yourself.
Sprinklers will directly spray the water in the irrigated area. They can be either constantly protruding above the ground, or hiding under it, as well as rising 15-20 cm up only during irrigation. The second option is used more often, since in this case the sprinklers do not interfere with the rest on the lawn and do not interfere with the movement of the lawn mower. Both static sprinklers, which irrigate a certain area, and rotary sprinklers, rotating within a given sector, can be used.
Since automatic irrigation often requires a combination of different types of sprinklers and, in some cases, the connection of drip irrigation lines, the installation can not do without the use of pressure regulators. They will ensure that each element has the required working pressure. This must be remembered when assembling automatic irrigation with your own hands.
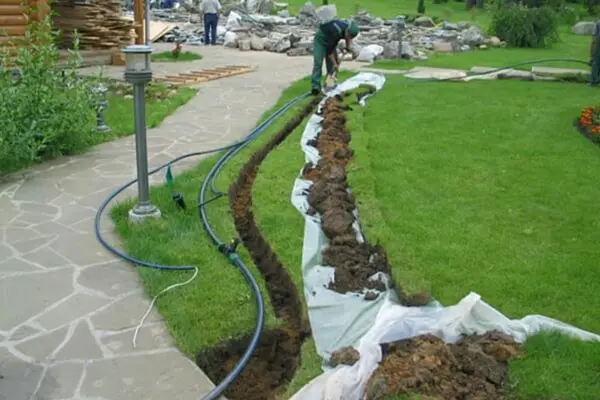
The water supply to the sprinklers is carried out through plastic pipes located underground. Since they stay at the installation site of the system all year round, it is desirable to place them at a depth below the freezing point of the soil. However, if for some reason this option is not possible, the pipes can be placed at a depth of about 25 cm. Low-pressure polyethylene pipes should be used, which are easily bent and quite simply connected using compression fittings, which is important when laying with your own hands.
Pipes for the main water supply section, as a rule, are used with a diameter of 32 mm, and as a distribution pipe – with a diameter of 25 mm. In order to make it easy to distinguish when buying, the former have a light gray tint, while the latter are painted in dark gray.
The design of an automatic irrigation system requires the use of different types of fittings: tees for branch pipes, connectors for extending the pipeline, plugs for plugging the ends, couplings and tees for connecting sprinklers.
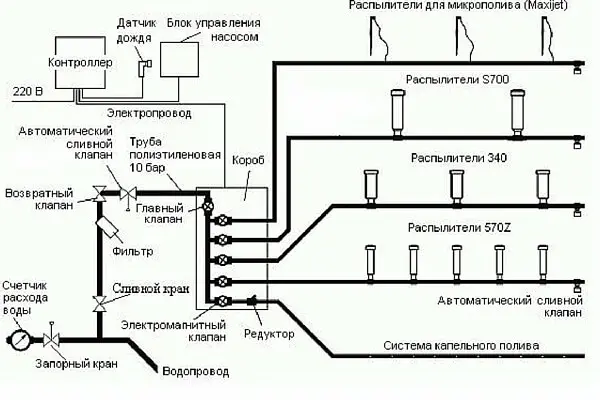
To organize irrigation when dividing the irrigated area into separate zones, special electromagnetic valves are used. Their opening/closing is controlled by the controller that regulates the operation of the system, which allows you to automatically set the time and duration of water supply at each section. After completion of work, water is removed from the pipes using drain valves installed at the lowest point. When installing irrigation with your own hands, it should be borne in mind that before the onset of frost, all water must be removed from the system, which is impossible without such valves.
You can connect the irrigation system using a garden hose and an inlet water outlet to a yard water intake tap. However, the central water supply is often unable to provide enough pressure for its proper functioning, so a pumping station is used. Its technical parameters are selected based on the estimated water consumption. In the event that a well is used as a source of water, fine filters should be used, otherwise the sprinklers will quickly become clogged with fine grains of sand and stop working.
The controller used to control the system gives commands to open or close the water supply to the main, open or close valves. At the same time, he is guided by the instructions of the program entered by the user, and can also take into account and analyze weather factors. To do this, in addition to timers, various meteorological sensors (temperature, wind force, rain) are also connected to it. Then the irrigation will automatically turn off in case of strong gusts of wind or frost.
Drafting a project
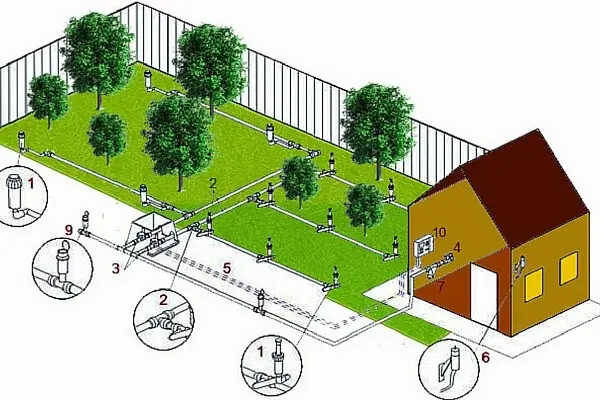
When arranging automatic irrigation with your own hands, it is important to draw up a preliminary project. You should start with a schematic plan of the entire lawn, on which images of the irrigated area, shrubs, trees located near or on it, as well as those areas that should not be watered (fences, buildings, recreation areas, etc.) are applied.
Further, the places of the proposed placement of sprinklers are marked with a spray radius being drawn. They should be installed around the perimeter and in the center so that the radii of each of them reach the heads of the devices adjacent to it. It is when using such a scheme that the uniformity of irrigation, which is important for lawns, is ensured. This is due to the fact that for sprinklers at a distance of about 3/5 of the irrigation radius, the amount of sprayed water is significantly reduced, therefore, for uniform moistening, the edges of the irrigation zones should be covered.
Then, in liters per minute, the water intake capacity and the throughput of the main pipeline are determined experimentally. Each of the irrigation lines should be designed so that the total water demand of all sprinklers connected to it can be provided by the water source and pipeline. Based on the irrigation zones, the places where the solenoid valves will be installed are determined. It is desirable to have them in one place, which facilitates installation and is convenient for further maintenance. The location of the drain valves is also noted.
The controller controlling the operation of the system is installed in a place protected from bad weather and is connected to a 220 V mains supply. The settings entered in the memory are saved in case of a sudden power outage thanks to an additional battery.
Then the places and direction of laying pipes of the main line and branches are determined. Pipes should go to the sprinklers in the shortest possible way, but at the same time have as few bends as possible. This helps maintain water pressure and reduces material consumption.
With a carefully thought out and properly calculated project, creating an automatic irrigation system with your own hands will not present any particular difficulties..
How to install and test
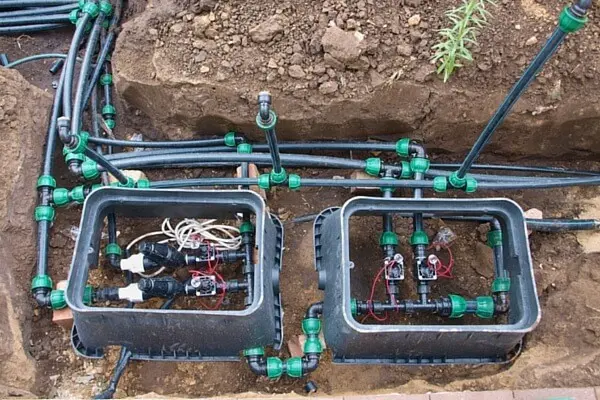
Installation of automatic lawn irrigation begins with the marking of the territory according to a pre-prepared project. First, the places for laying the pipeline are marked and the required depth of the trench is dug. Sometimes there may be obstacles in the form of tree roots or large stones. In the event that they cannot be eliminated, the piping plan should be adjusted.
Pipes, as a rule, are sold in coils, so they must first be laid out for alignment on the surface, and then laid in trenches. The electrical control cables leading to the valves must be laid in a special protective sheath.
Once the system is installed, it should be tested as a whole before the trenches are backfilled. First, water must be supplied to the pipeline to check the tightness of the assembly and clean it from dirt that has got inside. Then sprinklers are wound up and trenches are filled up. After that, the direction of water spray should be adjusted. Now you can enjoy your DIY automatic watering system.
Video “Do it yourself automatic watering”
This tutorial video will help you figure out how to properly mount and set up automatic watering for your lawn.


