Contents
Children dream of a bed at a height and for this they are willing to put up even with inconvenience. The second attractive moment for them is the opportunity to make their own territory at the bottom of the “house”. For parents, this option is attractive for the rational use of space. The only drawback of ready-made options is a solid price. A great way out is a do-it-yourself loft bed. Firstly, the costs will be small, and secondly, build exactly to your size.
What’s the best thing about loft beds? That they are used with pleasure by both children and adults. Moreover, children of any age – from toddlers who still go to kindergarten, to teenagers. With an adult audience, it’s a little more difficult. Young people agree on the attic bed, older people no longer find charms in relaxing upstairs. However, the age spectrum is solid. All models described below can be used both for children and adolescents, and for adults. Everything is solved simply – by changing the dimensions.
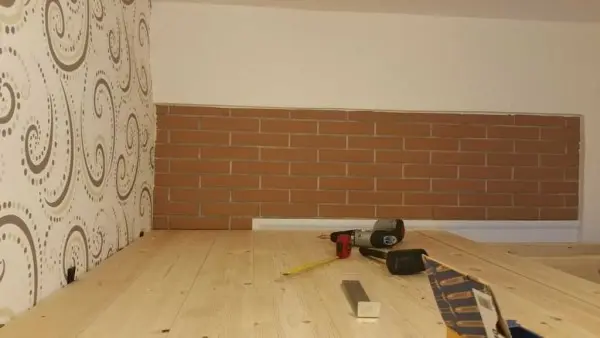
Homemade wooden loft bed in the entire width of the room
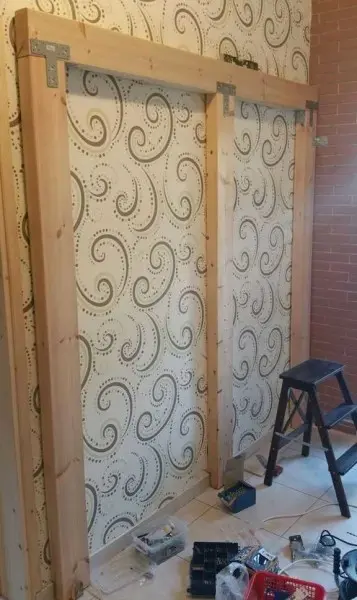
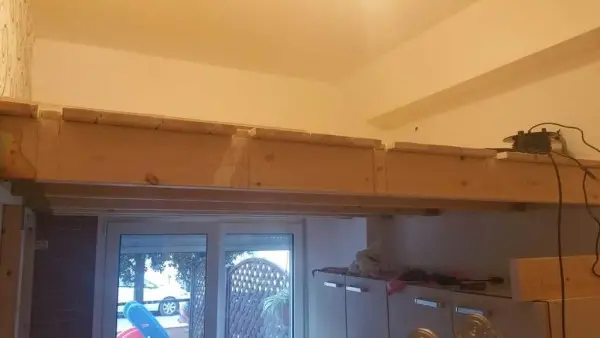
In the narrow room of a teenager with a width of 2,5 meters, it was decided to make an attic bed, put a ready-made chest of drawers and a wardrobe with drawers below. Therefore, the attic bed was made with their own hands on one side on support boards, since the bearing capacity of the walls allows.
Assembling the frame
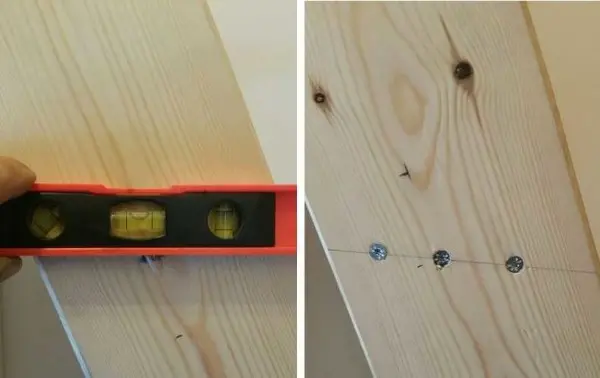
The height of the ceiling is large – almost 3 meters, they decided to make the bed at a height of about 2 meters – so that you can walk normally below. Markings were applied to the walls – vertical lines along which the upper edge of the support bars was aligned. These lines should be at the same level and be located strictly horizontally. The easiest way to do this is with a laser level (read how to use it here). If not, it will be necessary to level with water.
We simply nail a board on one wall – there will be a cabinet here, so just a support board, fixed to powerful anchor bolts.
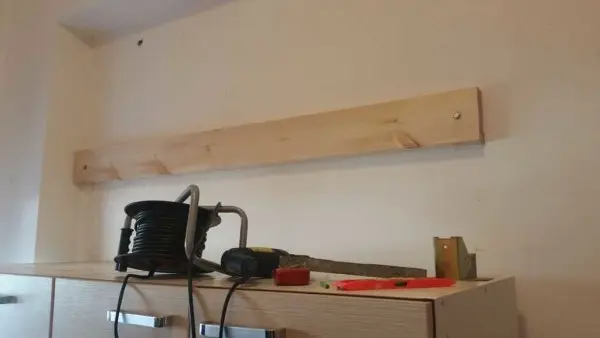
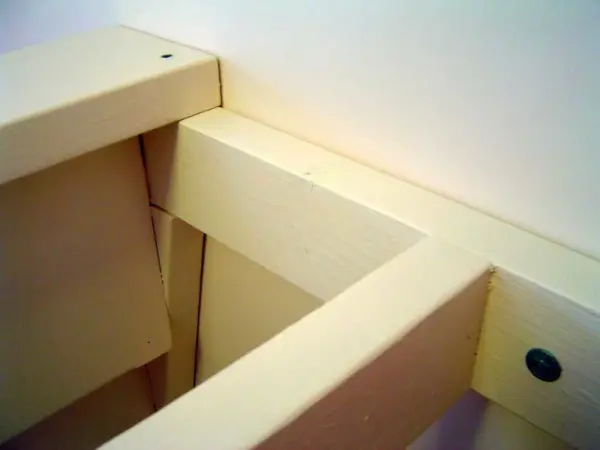
To this board it will be necessary to fix the logs – transverse boards. Mounting U-brackets are used for their installation. We nail them to the board with nails in each hole.
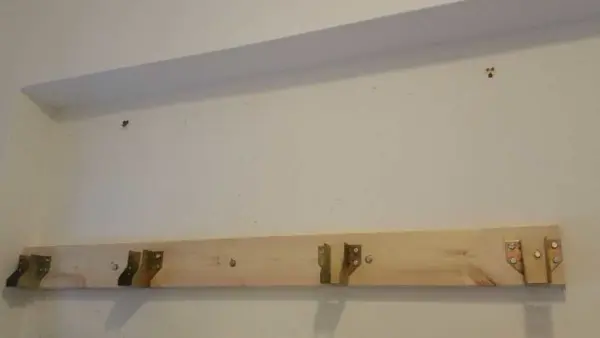
The installation step is 50-60 cm, but it depends on the thickness of the board that we will use on the flooring. The thinner the board, the more often you need to put supports.
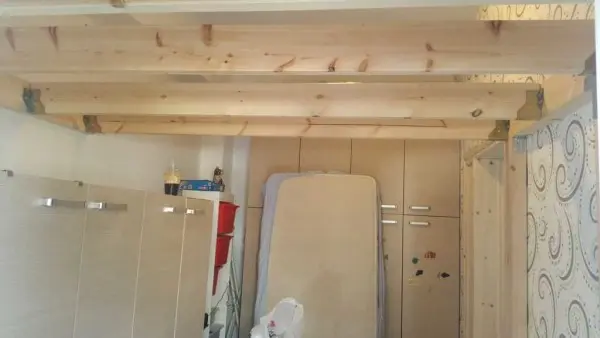
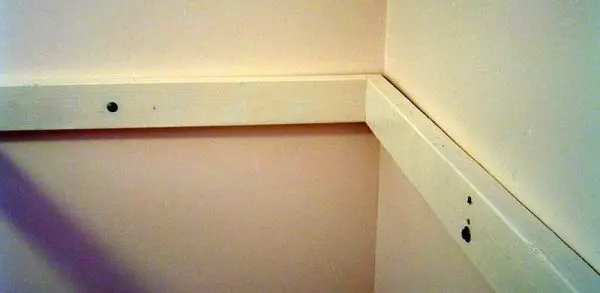
On the opposite wall we assemble the supporting structure, here we are going to make shelves, we assemble a frame for them. The top board should be located strictly on the same level as the opposite.
We fasten the boards to dowels (brick wall), reinforce the joints with metal mounting plates, check the verticality and horizontality of each element. To the upper bar at the same level as on the contrary, we fasten the supports under the flooring logs. They must also be located strictly in the same plane. We lay a beam cut to size on the supports.

In the side surfaces of the plates there are holes for the installation of fasteners. You can use wood screws or nails of a suitable length.
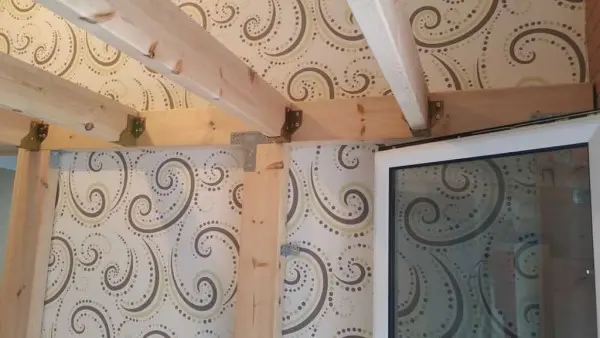
If everything is done correctly, all lags will be horizontal. You also need to check that their upper edges are all in the same plane.
Flooring
Dry planed tongue-and-groove board was used for flooring. It is laid across the lag, fastened to self-tapping screws. The length of the self-tapping screw is at least three times the thickness of the board: for a board of 20 mm – at least 60 mm. Fasteners are installed in each lag (at least one, but with a wide board, two can be in each lag).
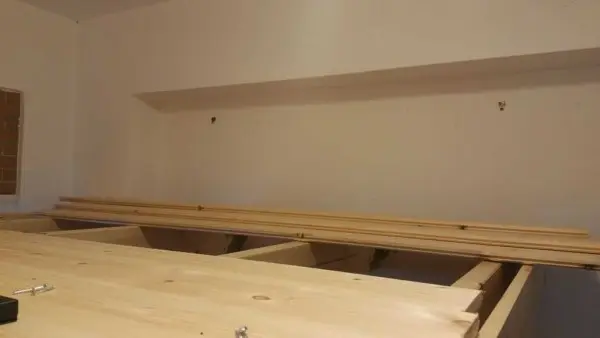
So that there are no gaps between the boards, take a mallet, a small – 50-60 centimeters – piece of board, insert it into a groove or ridge (which you get from the edge) and knock on this segment with a mallet, achieving a tight entry of the board over the entire plane. Then you can fasten.
Staircase construction
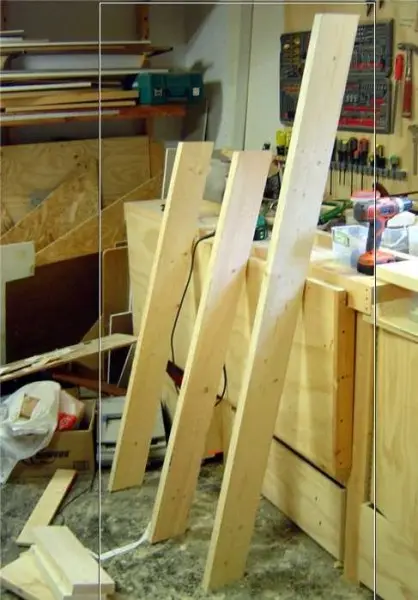
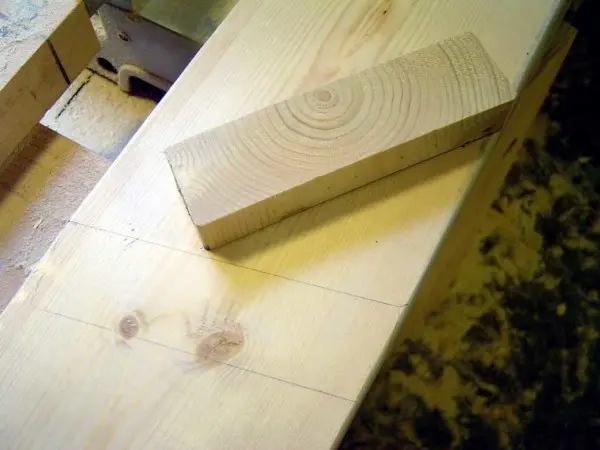
From a thick dry board, first we cut out two bowstrings – the sidewalls to which the steps will be attached. It is more convenient to climb if there is at least a slight slope. To ensure it, we cut the ends of the boards at a slight angle. Having set them in place, we mark a cutout that will fix the bowstrings in the desired position.
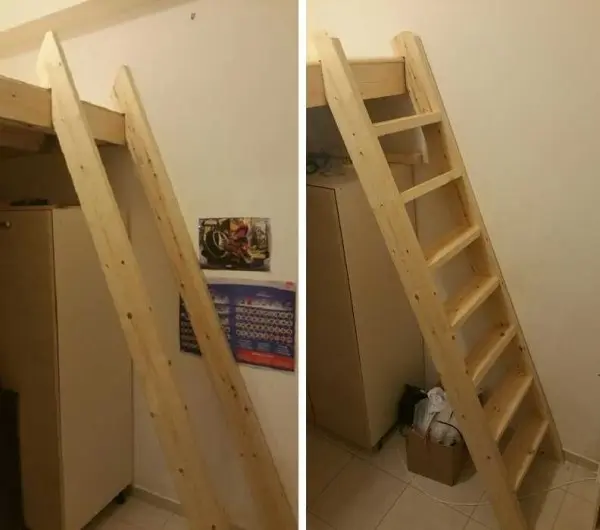
For a given height of stairs, we decided that seven steps would be normal. We divided the length of the bowstring into eight parts, got the places for attaching the steps. Now we draw a horizontal line at all these points (the bowstrings are in the “working” position).
We fill the steps along this line. On each side, we screw at least three self-tapping screws per step. Long – also not less than three times the thickness of the bowstring board. There is a second option for fastening steps – on the corners. Maybe that will make it easier for you.
The last stage is the installation of a railing in the upper part – it is more convenient to hold on this way (can be found in stores selling furniture fittings).
The last step is to fix the ladder – to the sidewall and floor.
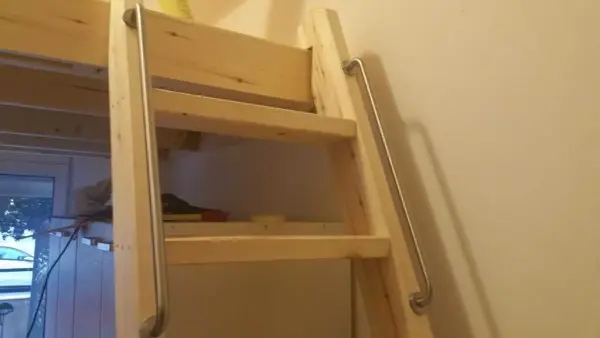
Railing installation
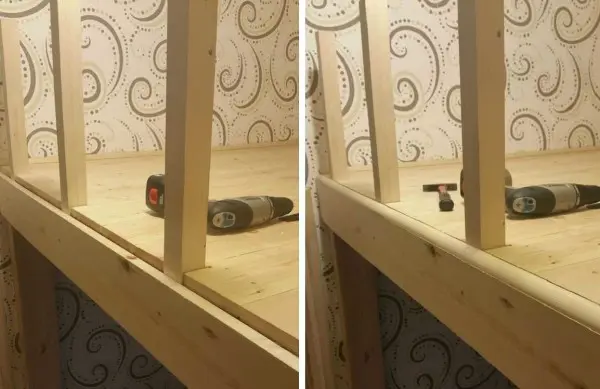
For the installation of railing posts in the extreme board, we make cuts (according to the dimensions of the timber used).
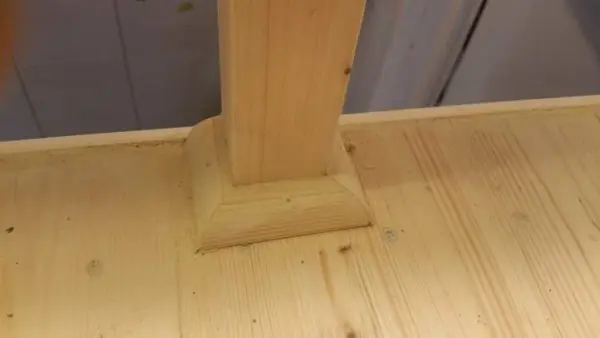
We mount the railing posts. They must be attached to the logs, in full width, for this, when cutting, we add the height of the log to the planned height of the railing. We fasten with nails obliquely, hammering three nails on both sides. To hide the mount, we nail a wide board to the end. It is attached to the racks and does not fit snugly. We cover the existing gap with a rounded bar (such as a plinth).
From the same plank we make a border for the racks – the joints are also imperfect. We saw off four pieces, joining them at an angle of 45 °.
We install a curly bar at the top. The railing is ready.


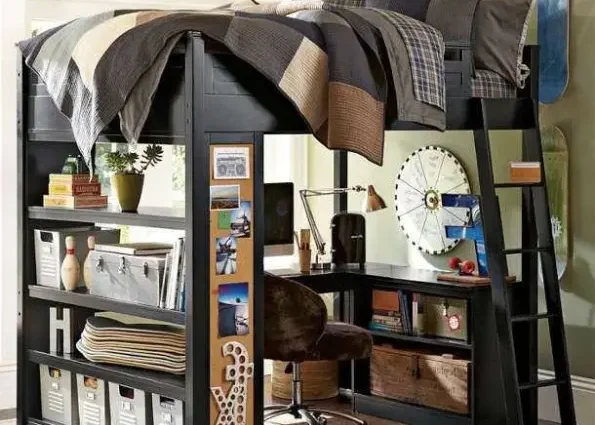
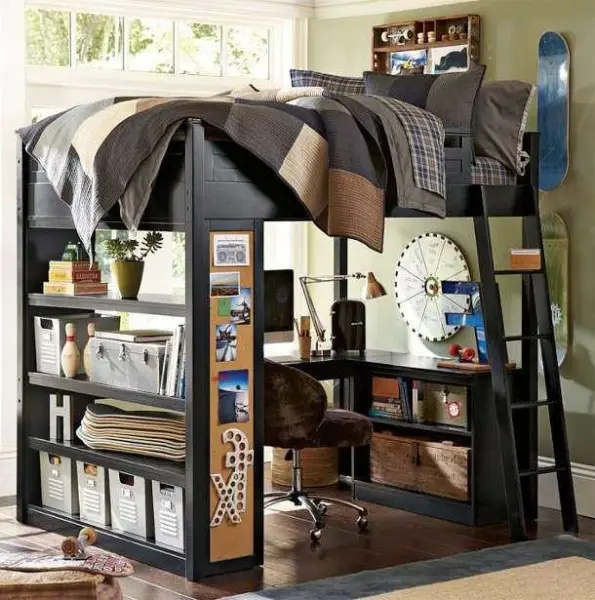
Work area equipment at the bottom of the loft bed
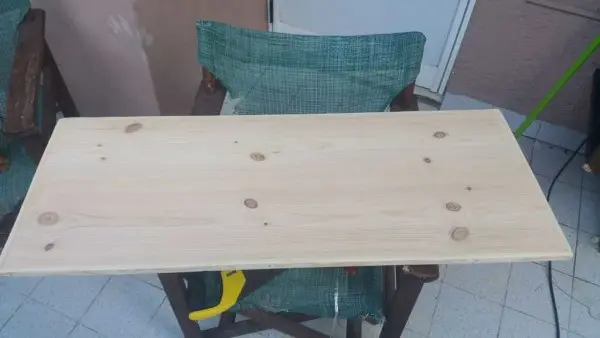
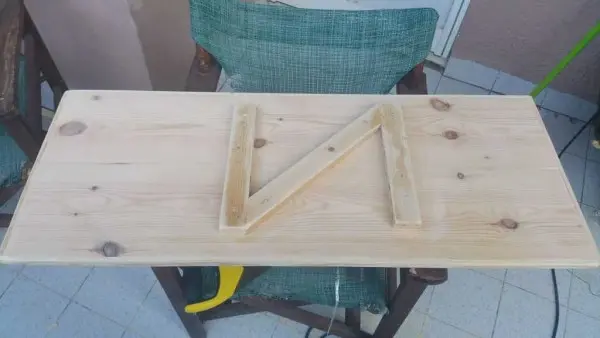
From two or three (depending on the width) relatively thin boards we make a desktop. We coat the joints with glue on wood, set them in a vice for the night. After the glue dries, sand to a smooth finish. First with coarse-grained sandpaper, then with fine-grained sandpaper.
On the reverse side we fasten the Z-shaped structure – for rigidity. We take self-tapping screws of small length – less than the total thickness of the countertop and plank – so that the points do not stick out. For reliability, you can coat the strips with glue, then screw them on.
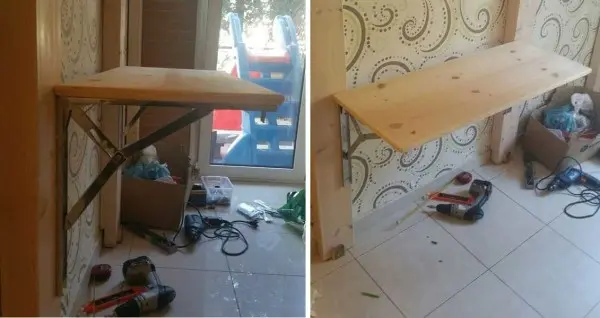
In the hardware store, interesting folding hinges were found that allow you to lower and raise the table top. Here on them we fasten it to the racks (the tabletop is made just under them in length).
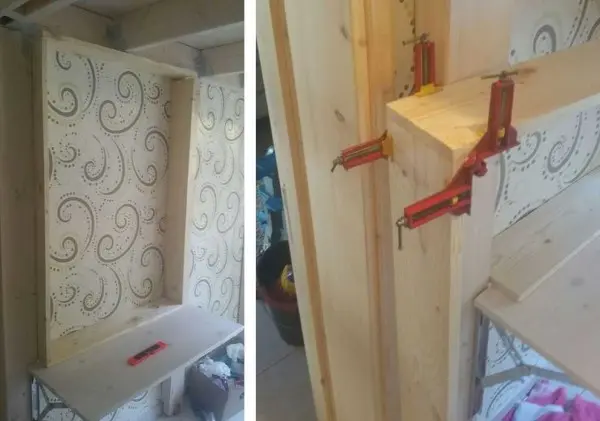
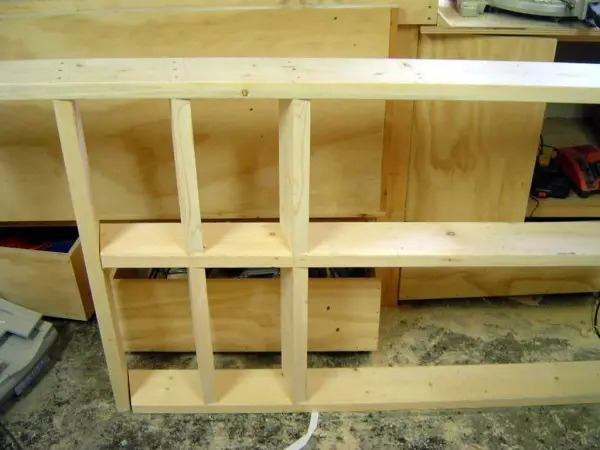
There will be a shelf above the tabletop. Immediately on the spot we cut the boards of the required length – from one rack to another. When sawing, we hold the saw perpendicular so that the saw cut is at 90 °. From the cut boards we knock down a rectangle. To strictly maintain right angles, we use an angular clamp. You can connect parts with nails or self-tapping screws – whoever is used to it.
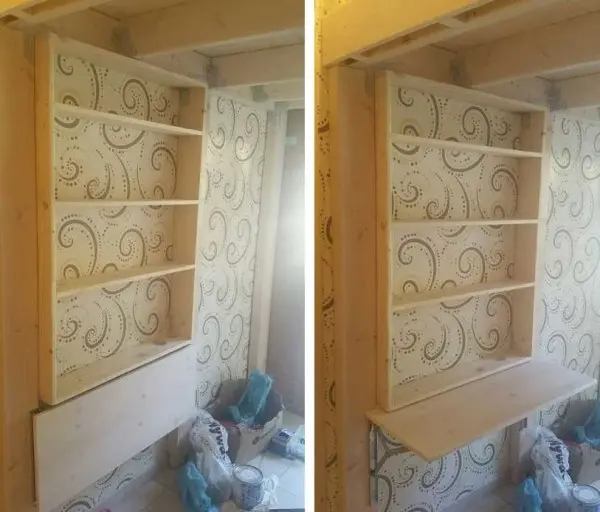
Then we install shelves in the resulting frame. During installation, always check the horizontal position.

We put the finished structure in place and fasten it to the racks.
Finishing
Now it’s up to the sanding. Take a grinder and a lot of sandpaper and achieve a smooth surface. After removing the dust, paint over with a stain if desired, and on top – with two layers of varnish (it can be water-based, it does not stink). We chose a bleaching composition – so the structure does not seem so massive.

The only thing left to do is to make the bed.
Photo report 2: do-it-yourself loft bed for a girl
This version is made of wood and plywood. The following materials have been used:
- timber 50*150 mm, 50*100 mm;
- plywood 15 mm thick (1,5 sheets of plain and 1 sheet of laminated on one side), and 6 mm for boxes;
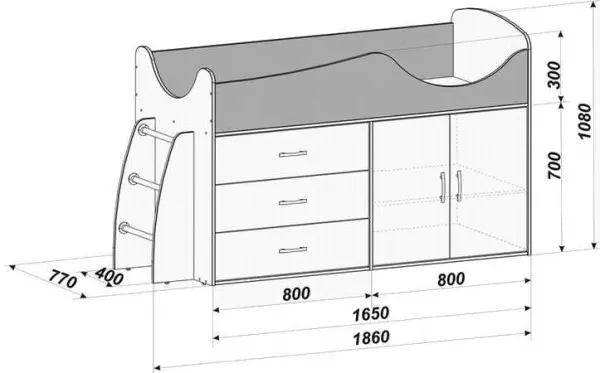
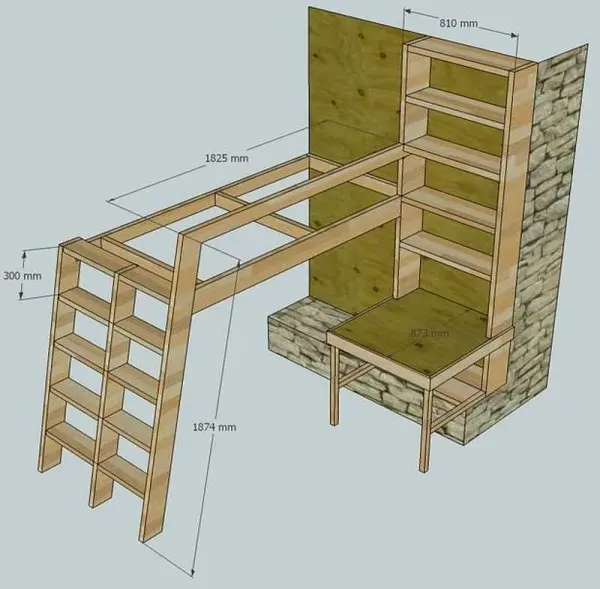
Loft bed drawing
A draft was drawn up with dimensions.
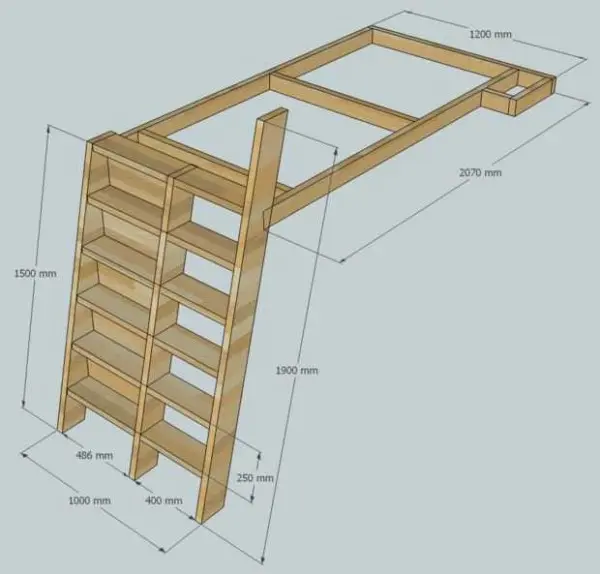
On one of the walls there is a workplace, and on the rest of the space there will be cabinets for storing clothes and toys.
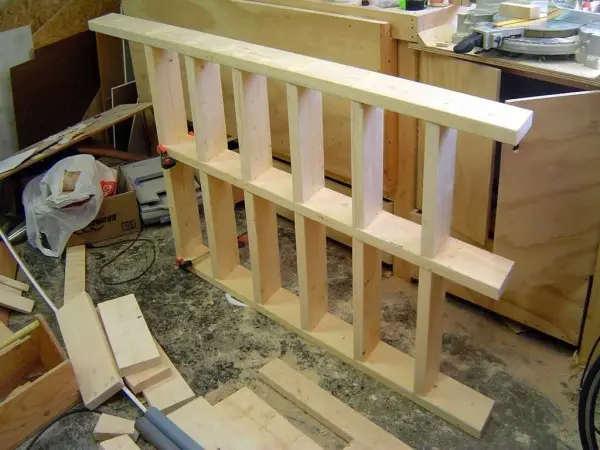
We assemble the stairs
From a board 50 * 150 mm we cut three bowstrings for stairs – two are shorter, one is longer (for this option 1 * 1900 mm, 2 * 1462 mm). To create the required slope, we cut the end parts.
Every 25 cm we mark places for installing steps. If we take into account the thickness of the degree (5 cm), then we get the planned step of 30 cm. When marking, we keep the same slope as on the cuts, therefore it is more convenient to do this by placing bowstrings.
Having prepared the required number of boards, we nail the steps. This project requires two different lengths – 400 mm for the part where the steps will be and 486 mm for the part where the shelves are. The upper step is made solid, its length is 962 mm. In the middle part, we screw the screws from below, at an angle (at least 3 pieces for each step), from the ends you can simply screw them through the board.
When fixing the steps, expose their edge on the front side in the same plane with the edge of the uprights (so that the steps do not stick out).
Shelves
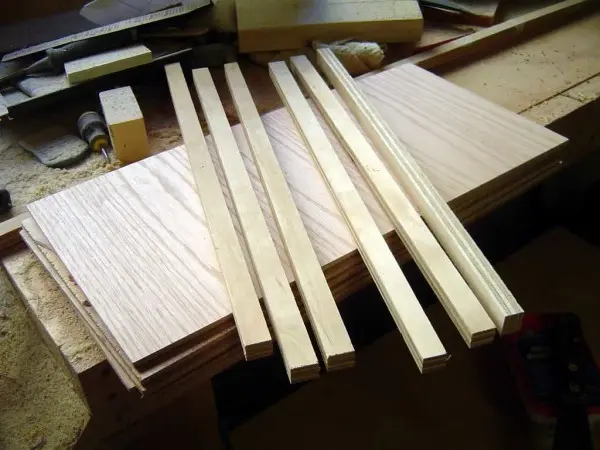
One part of the ladder is used as shelves for books, the second will rise. To prevent the books from falling, we fasten the walls of laminated plywood. First, we cut the plywood into pieces 250 * 486 mm (six pieces according to the number of gaps) and strips 20 * 486 mm (also six).
Fasten the strips to the steps first. They serve as a focus. Then we mount the rear walls of the shelves to them with glue.
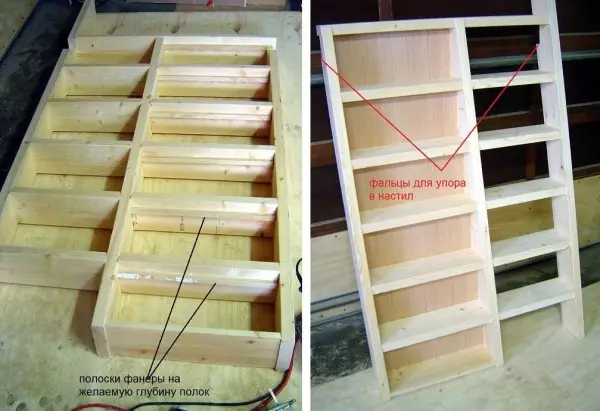
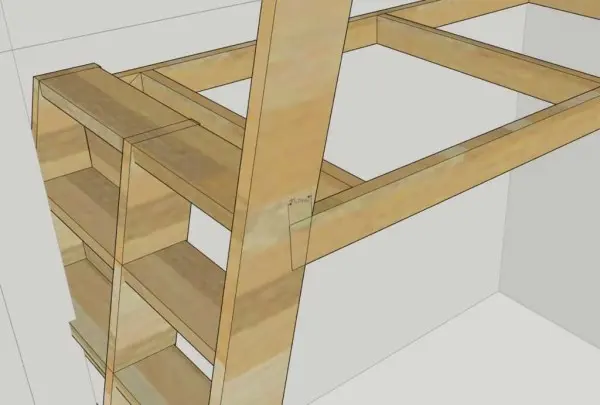
On the extreme bowstrings we cut out the folds. They are needed to fix the ladder to the bed frame.
We cover all recesses from fasteners and chips with wood putty (you can add wood dust that remains after sawing the wood – so the putty will not be visible at all). After it dries, everyone is compared with sandpaper and hands or a grinder.
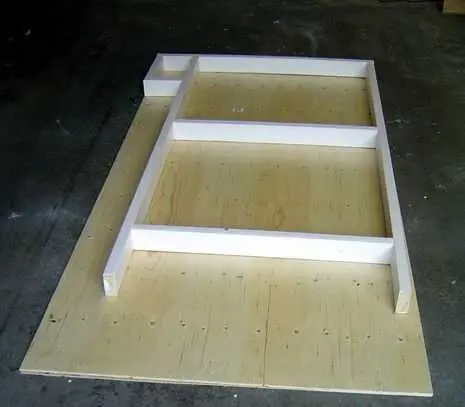
bed frame
First, we assemble the frame from the board 50 * 100 mm. The frame requires the following lengths: 2*2032 mm (side), 1200 mm (bar on the right), 2*964 mm – jumpers, 362 mm and 162 mm – for the ledge. We assemble everything on self-tapping screws (three per connection).

We try on the resulting frame to a plywood sheet, cut it to size. We pre-drill holes in plywood and board, and we will install self-tapping screws later – already on the mounted frame. The diameter of the drill is 1-2 mm smaller than the diameter of the self-tapping screws.
Installation
All finished parts are painted. In this case, they light up. After the paint has dried, proceed to installation. Helpers are needed here. It is necessary to install the frame in the grooves cut out for it on the stairs, it is also required to keep the frame itself strictly horizontal. Nails can be used for temporary fastening.
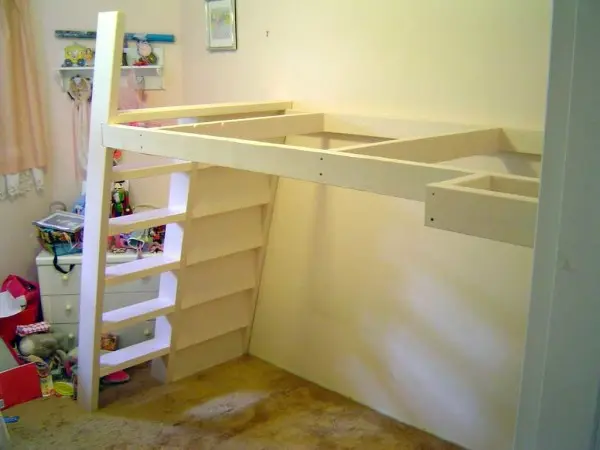
When everything is level, we attach the frame to the wall with studs. At least 4 pieces on the long side and two on the short side.
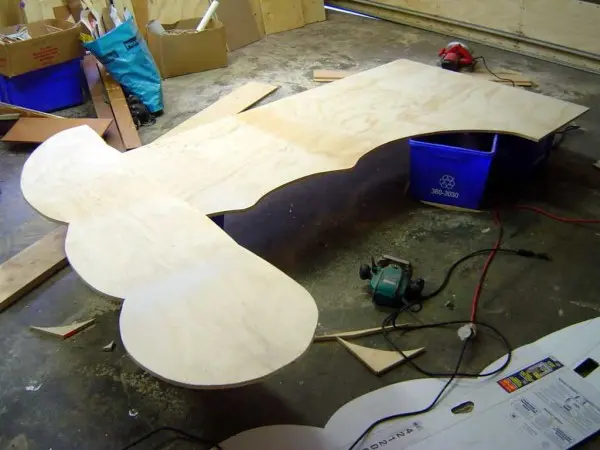
Railing
In this project, the railing looks like clouds. First, we make a template from cardboard – choose a shape, adjust the size. Having circled the template, cut out the blanks, round the edges with a grinder.
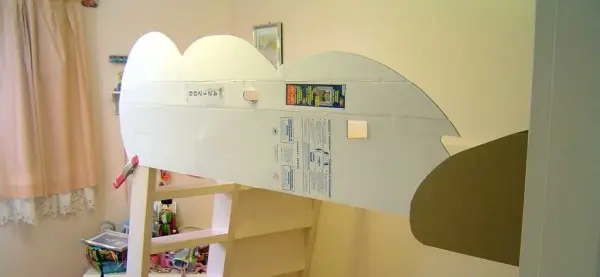
Paint, then install.
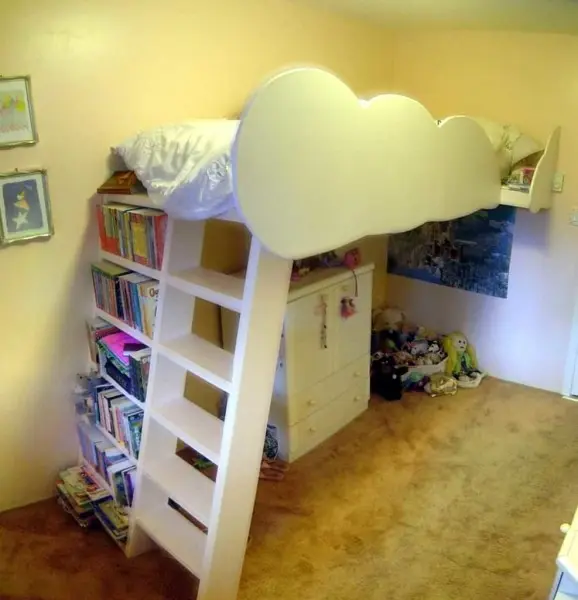
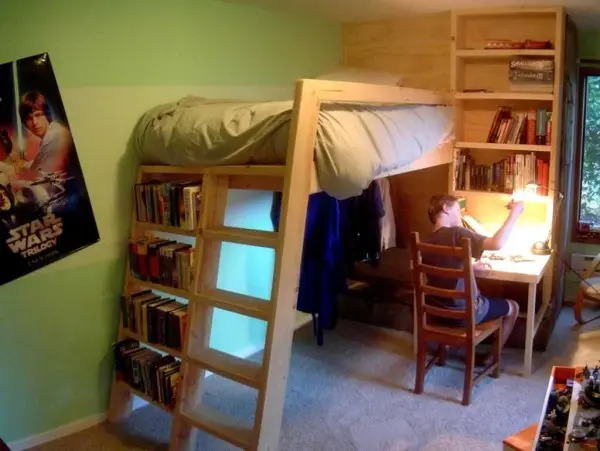
The second option with a bookshelf is for a boy.
The project turned out to be successful and, having slightly modified it, they made a second copy for the eldest son. For him, bookshelves and a table were added to the side. The height has also changed – the boy is tall.
A few more variations on the same project in the photo gallery.
Drawings for self-production