


Contents
Every beekeeper needs a wax melter, regardless of the number of hives available. The device can be purchased factory-made or designed with your own hands a primitive but effective design.
What is a “wax melter”, its purpose in beekeeping
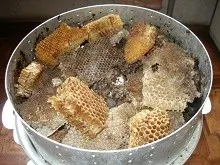
Beeswax is considered a useful product of beekeeping. It is used for medicinal purposes, cosmetology. Candles are cast from wax, used in some branches of the food industry, and a new foundation is made. To obtain it with your own hands, wax melters are used in the home apiary and on an industrial scale.
What are wax makers for?
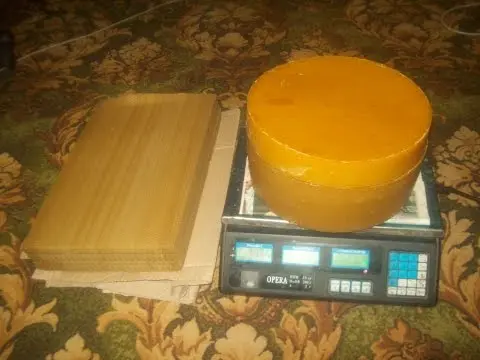
A factory or homemade wax melter is designed for one purpose – wax heating. The bee product tends to melt according to the principle of paraffin when exposed to temperatures from + 70 оC. A wax melter is a container inside which melting of used honeycombs takes place. The resulting liquid wax is filtered, poured into molds, left to harden.
Types of devices
To make a wax melter at home, you need to know about the existing varieties of fixtures and choose the best option for yourself. Common to all designs is a tank for loading and melting wax. The energy sources used to heat the bee product differ. Hence, each type of wax melter has its own design features. The following models for wax burning are popular among beekeepers:
- a device powered by solar energy;
- steam plant;
- centrifugal machine;
- electric model.
Any beekeeper can assemble each wax melting device with his own hands.
The principle of operation of the wax melter
Regardless of the design and the energy used, the principle of operation of any wax melter is the same. Cells loaded into the tank are heated to a temperature above + 70 оC. The firing process starts. Solid wax turns into a liquid state and then is used for its intended purpose.
Frame wax melter
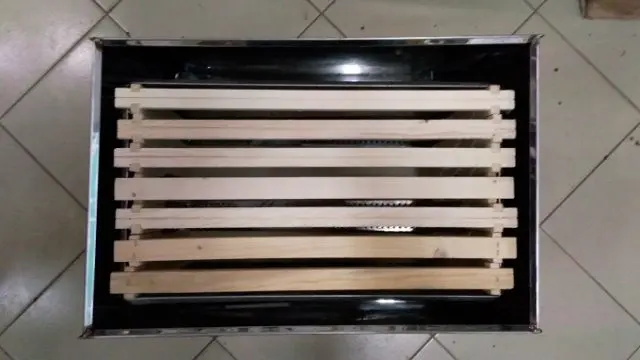
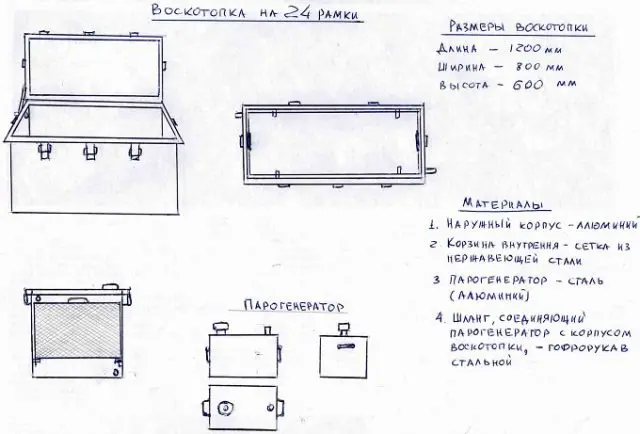
A feature of the frame wax melter is the ease of use of the device. Do-it-yourself wax can be melted directly from the frames without cutting out the honeycombs with a knife. For a small apiary, a steam wax melter for 6 frames, made in the form of a rectangular box, is considered a good option. If there are a lot of hives, they assemble a large structure for 24 frames with their own hands. The golden mean is considered to be a wax melter containing 12 frames. In addition to steam, solar energy or electricity can be used to melt wax.
Advantages of the frame model:
- inside the container between the frames, a high temperature is maintained for uniform melting of all honeycombs at once;
- simple device;
- there is no need to cut honeycombs, as they are loaded into the tank along with the frames.
Cons:
- the beekeeper must constantly monitor the temperature inside the tank during wax heating;
- when using steam or electricity, the flammability of the wax melter increases.
The frame model for melting wax is simple in design. The first version of the wax melter is based on the use of the energy of an open fire (bonfire). First, a metal box is welded with their own hands – the main body. A layer of sand is poured at the bottom, preventing the bottom from burning out. A metal sealed tank with water is installed inside the box, and another box of mesh or rods is immersed inside this container for installing frames.
To work, the wax melter is placed on a brick. A fire is lit under the hull. Frames are installed in the box, the device is covered with a lid. When the temperature rises inside the case, the molten wax will begin to flow into the water and settle to the bottom of the tank, where it will simultaneously be filtered from foreign impurities.
When all the frames are melted, they are taken out of the box. The container with water is taken out of the body, after cooling, the solidified pure wax is selected. Wash the device with your own hands in a heated state. Cold residues of adhering wax are difficult to clean off.
The second version of the frame wax melter is even easier to assemble with your own hands. All you need is one crate of water and a frame loading box. The lid is glass. A wax melter loaded with frames is placed in the sun. Through the glass cover, the honeycombs from heating by the sun’s rays will begin to melt, the wax will drain into the water.
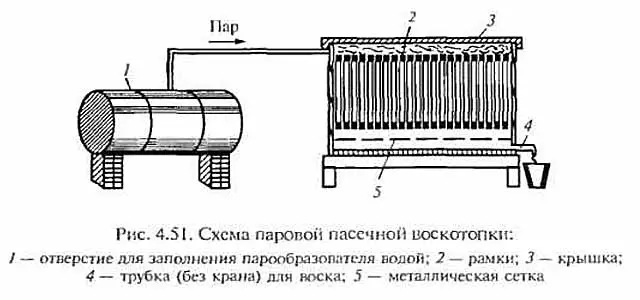
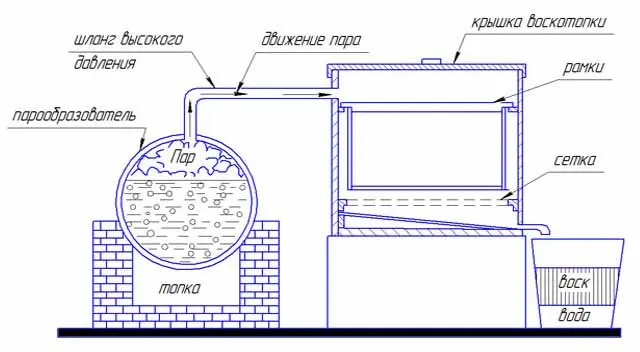
The third version of the frame wax melter is the most difficult, but effective. Melting of wax occurs in a gentle way from exposure to hot steam. According to this principle, steam wax melters from Granovsky, which are popular with beekeepers, work. For homemade, you first need to build a steam generator with your own hands. Water will boil in a hermetically sealed container, and the steam will be directed through a pipe with a hose into the wax melter, where the frames are installed. The steam generator itself can be heated on a fire or a gas stove.
Steam wax melter
On sale most often there are frame-type steam wax melters. The popularity of factory products for melting wax is due to a number of advantages:
- standard dimensions;
- comfortable, thoughtful design;
- rapid melting of honeycombs;
- obtaining high-quality unburnt wax;
- the wax melting process takes place with minimal intervention by the beekeeper.
Do-it-yourself assembled wax melter at home does not provide complete automation of the process. The beekeeper needs to observe the maintenance of the optimum temperature.
Do-it-yourself steam wax melter: drawings, tools and materials
To assemble with your own hands, you will need drawings with exact dimensions or, in extreme cases, a diagram of a steam wax melter. The design can be assembled according to your individual calculations. The steam unit for heating wax consists of 4 main components:
- hermetically sealed case with a lid;
- lattice basket for fixing frames;
- steam generator;
- container for the accumulation of liquid wax.
To construct a wax melter, you will need sheet steel. Perfect for galvanized and aluminum. Stainless steel is considered the best option, but it costs more. The frame basket is made of mesh or rods.
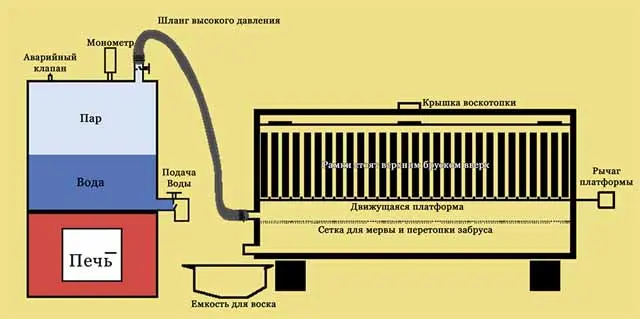
It is optimal to equip a home-made wax melter with your own hands according to the principle of a factory analogue with taps for draining molten wax. The steam generator is connected to the body of the wax melter with a flexible hose. It must be strong with a reinforced braid. It is important to install a faucet that regulates the water supply. If the liquid boils away, the container may burn out.
From the tools you will need a grinder, an electric drill, a welding machine, a hammer, pliers.
Do-it-yourself steam generator for a wax melter: drawings
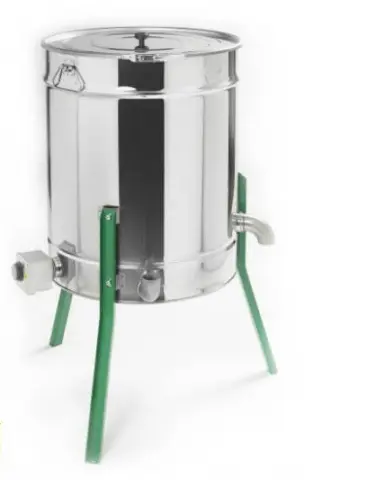
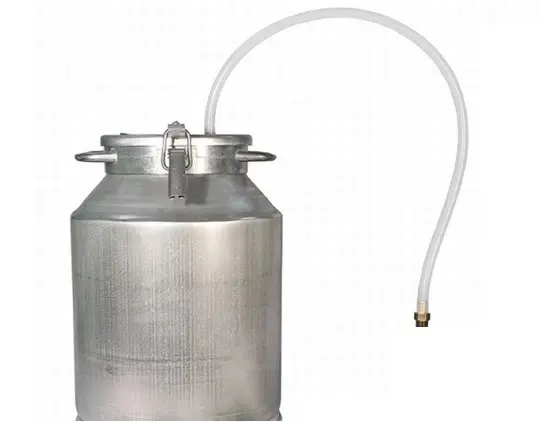
The power source of the wax melter is a steam generator. Under the complex name hides a sealed container with strong metal walls. A simple do-it-yourself steam generator for a wax melter is made from a milk can or a gas cylinder. The first option is more convenient due to the presence of a ready-made lid with a lock. The wide mouth makes it easy to pour water. The upper part of the steam generator is equipped with a fitting for connecting a high pressure hose.
How to make a steam wax melter with your own hands
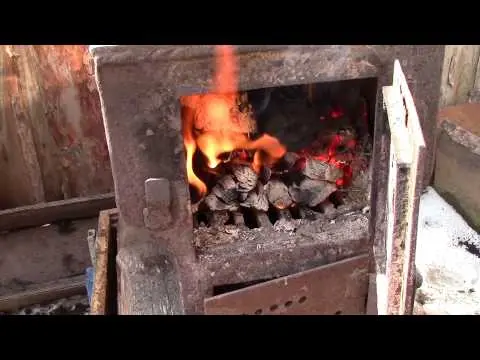
When the steam generator is ready, they adapt it with their own hands to the potbelly stove. Heating of water in a cylinder can be carried out using a fire, setting it on brick stands. A more advanced option involves inserting your own hands into a cylinder of an electric heating element connected to a thermostat. A high-pressure hose is removed from the outlet fitting, connected to the branch pipe on the body of the wax melter.
The do-it-yourself steam wax melter itself at home is assembled from a metal case with a closing lid. A tray is placed at the bottom, a tap is removed from it to drain the melted wax. A filter mesh is installed above, which will separate the merv from the wax. The frames are placed above the filter by adapting fasteners or a mesh basket.
An important stage of work is to equip the heating of the steam generator for the wax melter with your own hands. The simplest design involves the use of a modified gas cylinder adapted for a potbelly stove.
How to use a steam wax melter
Do-it-yourself wax heating begins with filling the steam generator with water to half the capacity. Above the liquid there is free space for vaporization. Inside the basket of the device for melting wax, frames are installed. In the steam generator, they begin to heat the water with fire or a heating element, which depends on the chosen design. As soon as the water begins to boil in the steam generator, steam will begin to accumulate and flow through the hose into the wax melter. Under the influence of high temperature, the honeycomb will begin to melt. Liquid wax flows through the filter mesh, accumulates on the tray and flows out through the drain cock into the prepared container.
The video shows in detail the process of melting wax:
solar wax melter
The simplest device for melting bee products is based on the use of solar energy. The design is a box covered with glass on top. Inside, a frame is fixed at an angle. The sun’s rays pass through the glass, heat the honeycomb to a temperature of + 70 оC. Under the frame is a grid. Melted wax is filtered through it, flowing into the pan.
The glossy wax melter works more efficiently, arranged according to a similar principle, but with the addition of elements of a device for processing photographs. Mirror sheets are taken from the old photogloss, fixed on the inner walls of the wax melter. Reflectors will reflect the sun’s rays from the walls, directing them to the frame. You can insert the photogloss itself inside the body of the device for melting wax, as an auxiliary source of heating from electricity.
DIY solar wax melter: drawings, tools and materials
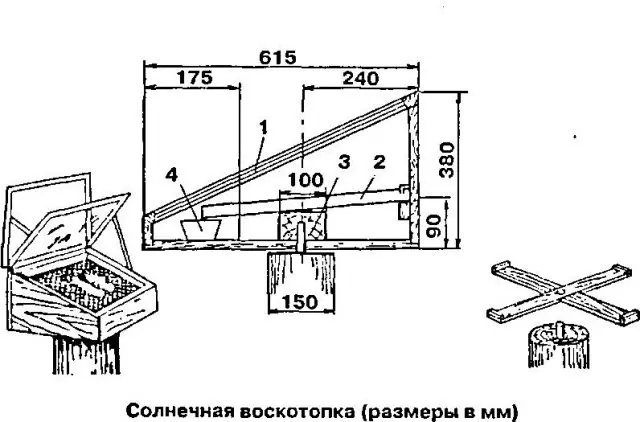
Of the materials for the manufacture of the wax melter box, you will need plywood or chipboard, wooden slats. The role of the cover will be performed by window glass. For safety, it is framed with a wooden frame. A metal tray made of aluminum or stainless steel is installed at the bottom of the box. You also need a fine-mesh mesh to filter the wax.
From the tools you need to have a saw for wood, a jigsaw, a screwdriver, pliers, a hammer. The elements of the box are pulled together with self-tapping screws. The opening lid is equipped with hinges.
How to make a solar wax melter
Do-it-yourself assembly begins with cutting blanks for the box according to the drawing. The elements are connected with self-tapping screws. Inside of the rails, limiters are installed on which the frame will be laid at an angle. A metal tray is installed at the bottom – a collection of wax, and a filter mesh is placed on top. A sheet of glass is framed with a frame of slats, fixed to the body with hinges. At this stage, we can assume that a do-it-yourself solar wax melter is made at home. It remains to install it in the sun, lay the frame, wait for the result.
Electric wax melter
By the name of the device it is clear that the source of energy for melting wax is electricity. Most often, such designs are made combined. By covering the tank with a glass lid, solar energy is additionally used. The device of an electric wax melter is similar to the solar model. The advantage is the additional heating of the wax.
A dry heating element or a household appliance acts as a heating element: a kitchen electric stove heater, an old iron, a photogloss. The connection is made through the thermostat from the iron. Thermal contact will automatically maintain the set temperature. The heating element inside the body of the wax melter is insulated with aluminum sheets.
DIY centrifugal wax melter
The centrifuge is considered convenient and easy to use. However, for kindling honeycombs, it must be connected to a steam generator. You can take a centrifuge from an old washing machine. Crushed honeycombs are placed inside the drum in plastic bags for remelting. The centrifuge is turned on and steam is supplied with the beginning of the rotation of the drum. The melted wax remains in the bags, but then it will still have to be manually filtered. The advantage of the centrifuge is the speed of processing bee products.
How to make a wax melter
There are many primitive ways to help make a wax melter with your own hands at minimal cost. The simplest example is to melt honeycombs in a pot of boiling water. The mass is filtered through a filter mesh. The wax is left to cool in a bowl, from where it is then taken out in the form of a thick pancake. To make more effective homemade products with their own hands, they use old household appliances, kitchen items, and utensils.
From juicers
Owners of an aluminum juice cooker can freely use it without alteration for remelting honeycombs. The kitchen appliance consists of a container for boiling water, on top of which a juice collector with an outlet pipe is installed. The third container is loading with holes, resembling a colander. Everything is covered with a lid. In fact, the juicer is used as a steam wax melter.
The lower container is filled with water, put on a gas or electric stove. Collect the remaining elements of the juicer. Honeycombs are placed inside the colander, covered with a lid. The steam melts the wax, it drains through the holes, collects in the juice collector, from where it is drained through the outlet pipe.
The principle of using a juicer for burning wax is shown in the video:
From the washing machine
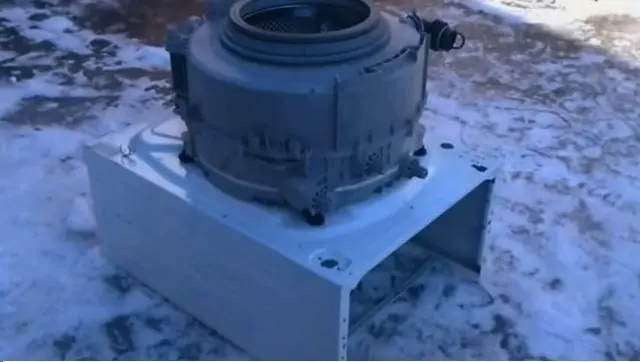
With simple manipulations, an old automatic washing machine can be converted with your own hands into a convenient wax melter in a couple of hours. The device is first completely disassembled. For homemade leave:
- decorative casing of the machine;
- plastic tank with stainless steel drum;
- hatch rubber seal;
- drain pipe and intake hose.
All other details are thrown away. Separately, you will have to make a cover for the drum. Usually it is cut from sheet steel. After preparing all the details, they begin to assemble the device for the wax furnace:
- The body of the machine is used instead of the stand for the wax tank. It is laid flat without a front, top and bottom wall. Spacers must be placed inside the body so that it does not move around under the weight of the tank.
- A tank with a drum is laid flat on the body, the loading window is up. The rubber collar is left in place for a snug fit of the lid. The tank is connected to the stand from the body with bolts. All native holes are jammed with rubber stoppers to prevent wax from leaking out. There should be an open drain pipe on the tank. Additionally, 2-3 holes are drilled on the back wall.
- The steam generator is made from a milk can. A hole is drilled in the lid, a fitting is inserted, and a suction hose is connected. Its other end is connected to the drain pipe on the tank.

The structure is ready. The can is half filled with water, put on fire. Honeycombs are laid inside the drum, covered with a lid, pressed with a load. When steam appears inside the can, it will go through the hose to the tank, where it will begin to warm the honeycombs through the holes of the drum. Liquid wax with hot condensate will begin to flow from the drum into the tank, and from it through the drilled holes into the trough substituted from below. After solidification, the remelted product will easily separate from the water and float to the surface.
From the fridge
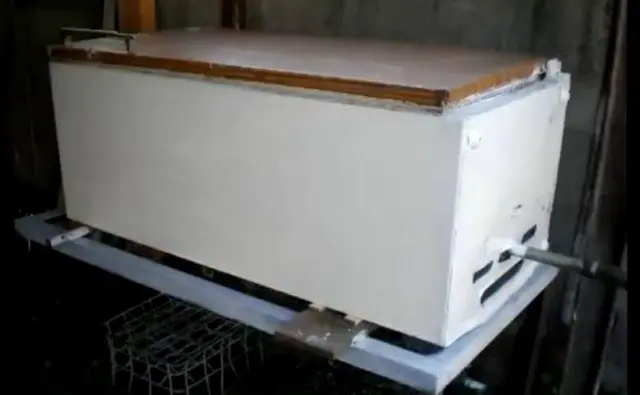
Not every refrigerator is suitable for a wax melter. We need to find an old household appliance, where an aluminum casing is installed instead of a plastic inner insert. The refrigerator is free from all parts. Only the body is needed. A hole is drilled in the center of the back wall, a metal pipe is inserted. This will be the drain for the melted wax. The refrigerator is laid horizontally on the stand with the nozzle down. The next hole is drilled on one of the side walls of the refrigerator, a metal pipe is inserted, a high-pressure hose is connected to supply steam.
Inside the refrigerator body, a filter mesh is fixed closer to the bottom. Fasteners for frames are placed above or a mesh basket is installed. The other end of the hose is connected to the steam generator. When the water boils and steam fills the refrigerator case, the honeycomb will begin to melt. Liquid wax will drain through the mesh on the bottom and exit through the drain pipe. From below, a tray is placed under the refrigerator, where the melted wax is collected.
Conclusion
A wax melter of any design is arranged and works according to the same principle. Honeycombs melt at high temperatures. If you do not follow the safety rules, you can get burned. In the case of a steam generator, there is a risk of its rupture or hose rupture if a large steam pressure is created from excessive heating. An electrical device is dangerous in terms of electric shock during the breakdown of the heating element. The solar wax melter can be considered the safest, but it is inefficient. Which model to choose is up to the beekeeper himself.