


Contents
Vertical gardening is a popular topic in recent years. Depending on the size, there are phytowalls, paintings or panels. Mobile compositions are also called phytomodules. All of them have one thing in common – they are made up of living plants. In the article we will discuss how to make a phytowall with your own hands.
Organization of watering plants
A wall, panel or picture of living plants needs watering. Water can be supplied using a plastic pipe of small diameter with holes made in it. This tube is installed at the top of the picture/wall.
Soil moisture sensors can be used to monitor moisture. There are automatic ones that supply power to the motor that pumps water. There are simple and cheap ones – they are stuck into the ground and change color depending on the humidity. When you see that the medium has dried up, turn on the watering yourself.
A container with water is placed not far from the phytodevice. A low-power pump (aquarium) is lowered into the tank. We take the pump performance with a margin of 50-60%. This means that if the water supply point is at a height of 150 cm, the pump must be able to deliver water to a height of 225-240 cm or a little higher.
Using a flexible hose of a suitable section (adapters can be used), the pump is connected to the tube. Under the panel / picture put a tray to collect water. Better if it’s plastic. A hole is made in the bottom, a hose is inserted / melted / glued. The other end is lowered into the container. This is how excess water is removed and put into circulation.
Planting methods
There are two types of green walls – with plants in pots (traditional type) and hydroponic – without soil, in a nutrient medium that is supplied dissolved in water.
Phytowalls with plants in pots
In the traditional way of keeping plants, pots are placed in specially designated places. In purchased modules, these are plastic trays, in home-made ones – most often pockets made of fabric, but there may also be a metal grill. Irrigation is organized in two ways:
- Drip. This means that the tubes that supply water are led directly into the pot. Excess moisture is removed from the tray through an opening in the bottom to which the tubes are connected. They go into a container, from where water is again supplied to the plants.
It is also a wall of green plants, though not solid. - Due to the suction of water from the pan. In such systems, at each level there is a plastic container, in the lower part of which a tap with a hose is built. Often there is also a water level indicator in each of the trays. The pots here are special – on high legs, in which there are holes. Through them, water enters the roots of plants.
With the “standard” method – in pots – watering is required every 5-14 days, depending on the type of plants, the time of year and the dryness of the soil. Before doing this, add liquid fertilizer to the water.
Before planting a store plant in the wall, it is better to transplant it. Even if the pots are the right size, the soil needs to be replaced. There is too much peat in the store, which does not retain moisture well, which is not good for a phytowall.
What are the disadvantages of phyto-pictures with plants in pots? The first is weight. You need a solid base and reliable fastening. The second drawback is that the diseases that the soil of one plant can contain will spread quickly. Actually, these are all shortcomings.
Advantages: easy to replace plants, watering and fertilizing can be organized personally for almost every plant.
Hydroponic method of forming phytocompositions
Hydroponics is growing plants without soil. The main thing here is the supply of nutrients. They will be supplied with water and spraying should be turned on every 4 hours. This is one of the main disadvantages, since self-watering is not suitable, automation is required. The second disadvantage is the selection of plants. Ideally, those that are grown without soil are required. Slightly worse, but acceptable if they have been adapted (grow without soil for a couple of months). If you transplant ordinary plants into a hydroponic phytowall, be prepared for the fact that many (about 50%) will die or lose their decorative effect.
For hydroponics, dried sphagnum moss, coconut fiber, and other similar materials are used instead of soil. They can be used alone or mixed. For drainage, pour a layer of expanded clay into the bottom of the tank. These soil substitutes will absorb moisture well along with dissolved fertilizers.
Plants before planting in a living wall / picture without soil, you need to prepare:
- Clean the soil from the roots, rinse them and dry them a little (use paper towels, for example).
- Trim the roots about 1/3. If the root system is small, cut off only the tips of the longest shoots.
- Wrap the roots with dry moss, on top you can wrap it in a synthetic porous fabric that absorbs moisture well.
- Insert the resulting “package” with roots into the prepared place under the plant.
- If there is free space around the “package”, fill it 1/3 with expanded clay, lay a little of the same moss or coconut fiber, hydroponic soil on top.
Before transplanting, carefully inspect the horses. There should be no sick, rotten, affected. If you find such a “defect”, eliminate the damaged areas and leave the plant in quarantine – in a jar of nutrient solution. If the disease does not manifest itself, you can land it on a wall / panel.
How to choose plants
For phytowalls / paintings in an apartment or house, any plants that are grown at home are suitable. It is only necessary to select species with the same growing conditions: illumination, irrigation regime and the necessary nutrients.
Organizing separate watering or top dressing is too troublesome and inconvenient, although everything is in your hands. If you choose a system with plants in pots, they can be watered and fed separately. But there’s nothing to be done about lighting. It will not work to highlight only part of the plants. So the first and main requirement for the choice of plants is the same standards for the amount of light.
The easiest way to make phyto-pictures is from stabilized moss. This is a specially processed moss, which practically does not change its appearance. It requires a minimum of care – brush off the dust.
There are mosses of different types, colors (different shades of green and gray), thanks to which compositions are created in vertical gardening. Stabilized moss is sold by firms engaged in similar landscaping. But this is not living moss. He’s canned.
There is a limitation for hydroponic systems (planting without soil and supplying nutrients in water). For them, it is preferable to plants that are grown in hydroponics. They are adapted and there will be a minimum of problems with them. Plants grown in the usual way, you must first “train” – transfer to hydroponics. If you do it yourself, at the same time learn how to select / control nutrients.
Which plants behave well in phytocompositions: a list of recommended
To get started, try planting plants that grow normally at home:
- singonium,
- ferns;

An example of plants that can be planted in one composition - spathiphyllum;
- cissus
- epipremnum;
- chefler;
- asparagus;
- philodendron;


Try out the technique of growing a green wall in these containers. Looks great and easy to care for - Mullenbeckia;
- scindapsus
- maranta;
- chlorophytum;


Fewer types of plants – not always tasty and ugly. Some of them are very attractive on their own. - pellionia;
- nephrolepis;
- tradescan.
Plants from the list are not capricious to neighbors, not demanding on the microclimate. For beginners, this is the best start. More difficult to grow can be added later.
Homemade panel or phyto-picture
The easiest way to make a living wall of plants is to buy a ready-made module and pick up and plant plants in it yourself. The advantage is that the factory module is sealed, it can have a built-in irrigation system. Minus – the price. She is far from humane. Well, you will have to adapt to the dimensions of the module.

Homemade living picture based on the frame
We paint a wooden frame of a suitable size with paint on both sides. This is necessary to protect the wood from decay. Choose a color depending on your preferences – bright, if you want to emphasize that this is a painting. Brown / green – if you do not want to highlight it.
Additionally fix the corners by installing metal corners. You can fill a bar or bar along the top and bottom in the entire width of the picture. Once again: special attention to fixing the corners. If this is not done, the frame will fall apart from the weight of the plants.
From the back side of the frame we stuff carnations and stretch synthetic threads or fishing line on them, creating additional support for the canvas with plants. Instead of threads, you can use a piece of finished mesh made of synthetic fibers.

From synthetic felt or other dense synthetic fabric that absorbs moisture well, we sew the basis for a phytopicture. We fold the fabric in two to four layers. The size of the canvas should be the size of the outer edges of the frame.

At the top we make a stitching to fit the size of the tube for supplying water to plants. The rest of the field is divided by a line into rectangles / squares. In the tops of the resulting cells, we cut one or two layers of fabric, forming a pocket. If the fabric stretches, it is better to strengthen the lagging part of the pocket by sewing or gluing a strip of dense fabric. Suitable inlay for hemming trousers, for example.

On the back side of the base we lay a waterproofing layer. It can be a dense plastic film or a waterproof membrane. It can be stitched along the edge, but do not make holes in the middle.

We insert a piece of tube into the finished base, connect the hose and the pump. Then we fix the tube in the upper part of the frame, and pull the other three parts onto the same studs. Along the perimeter, we fix the base to the frame with brackets from a construction stapler. If it is not there, you can hammer the staples with a hammer. Staples can be replaced with small nails or “flea screws” for drywall. Next – planting selected plants. And, in fact, your home-made picture of living plants is ready.
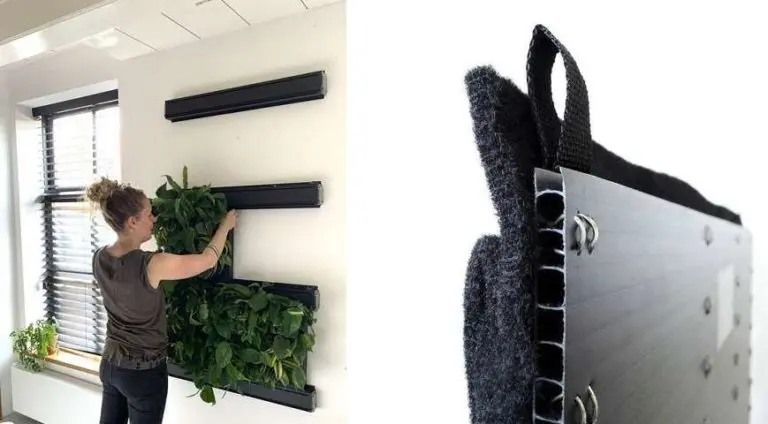
We make a green panel based on plywood and potted plants
The previous option is not very good due to possible leakage and because of the soft fabric base. In general, there are many problems with this option. Therefore, in the next panel, we leave the flowers in pots, but it needs a more stable base.

We make the basis for the phytopicture from waterproof plywood. Cut out a rectangle of the appropriate size. We nail the bars at the top and bottom, which will set a certain distance from the wall (30 * 30, for example). We attach hooks to the upper bar (furniture for hanging cabinets). We lay two layers of synthetic felt, mats made of coconut fiber. We stitch them together. The felt will absorb moisture and retain it, creating a microclimate.

For large panels, it is better to nail the base onto a profiled pipe. From it you can also form a stand under the pallet to collect excess water.
From the third layer we form pockets. Since we will insert plants in pots, we sew pockets to fit the size of the pots, making folds. We cut out a strip from felt, which is at least 5 cm higher than the height of the pots. To prevent the upper edge from stretching from gravity, sew a dense synthetic tape to it. Next, we sew the right edge, make folds to fit the size of the pot, sew the bottom and left side. And so on.

The irrigation system can be organized as described above or standard drip irrigation can be used. But a tray to collect residual moisture is needed in any case.
How else can you do it: ideas with photos
Vertical gardening or vertical garden and greenhouses are very popular. They require a minimum of space, and look very attractive. There are many ideas, everyone can find something for inspiration.

Pockets and pockets
If you don’t know how to sew, use shoe pockets. They are great for cutting plastic bottles or small pots. For irrigation, you can insert segments of tubes into them, which are connected to a common tube.
Knock down the base from planks, drywall profiles, profiled pipes – it depends on the size of the module. Attach plywood (or other sheet material) to the frame, a film or membrane for waterproofing on top, and only then nail the pockets.

Alternatively, you can sew on separate pockets and attach them to a grid or horizontal guides (photo below on the left). The advantage is that you can grow a replacement separately and insert finished fragments into the picture. Adaptation will be easier and easier.

Another plus is that it is easy to increase the size or change the composition, adjusting to the needs of the plants. For outdoor cultivation of green walls in felt pockets, you can make a rack as in the photo above on the right. The advantages are the same, plus mobility: you can move from place to place.
The two photos in the center are about creating a vertical painting from coconut fiber mats. Instead of pockets, containers made of coconut linen were used. Wire fastening guarantees reliability.
Metal mesh, pots and their substitutes
Even for a green wall, you can use a metal mesh with a large cell. The main thing is to choose the size of the pot. It turns out quickly and cheaply to make the basis. An even cheaper option is to use plastic bottle scraps. Bottles are needed with a notch at the bottom. They sell Coca-Cola, for example. And so that the thin edge does not cut the plants, melt it by attaching it to the hot metal for a second.

In the photo above, on the right, there is quite a decent stand for vertical gardening from two metal meshes. At the bottom, something like a gabion was made – for the stability of the structure.
In the photo below, a more reliable and stable version of the basis for a phytopicture. The frame is assembled from two rows of planks that overlap each other in the corners. In addition, the corners are reinforced with metal corners. Mesh is nailed as a base. On such a frame, you can attach felt with pockets or insert pots.

The photo in the center above is an option for those who care about moisture that can transfer to the walls. Use a metal screen. Bend its edges by 5-10 cm. This will give the gap required for ventilation. Fans can be installed in this design (even suitable from a computer) to ensure air movement from the back.
The photo on the right above is a variation on the use of metal mesh for vertical gardening. In this case, watering is individual – watering can.
More ideas
Some plants thrive on wood. They can be planted on saw cuts or parts of the trunk.

For street green walls, you can make modules of different types. On a metal, wooden or rope base. And even with solar panels (on the left photo below).
