


Contents
Kokedama is not only an exciting activity, but a real work of art that came to us from Japan. This moss ball can be used when there is no room on the windowsill. In today’s article, we offer you a real master class in making kokedama.
What’s this
Kokedama is one of the branches of bonsai art. It originated in Japan only 20 years ago, but has already become popular around the world. Translated, this Japanese word means “ball of moss” or “moss tussocks.”
If only a true master can create a bonsai, then even an amateur will succumb to kokedama. For this reason, this moss ball is called the bonsai for the poor, but it would be more accurate to say the bonsai for the impatient.

Do-it-yourself Kokedama is made very quickly at minimal cost. You do not need any container, you just need to form a lump of soil mixture and wrap it with moss. The kokedama of graceful orchids looks very beautiful. It will decorate the interior of any room.
To make a kokedama, you do not need to follow any strict rules. Each person can create his own exclusive “moss tussock” and decorate with those plants that he likes best. The main thing is to adhere to the proportions, which we will discuss below. Although more experienced flower growers can create their own proprietary soil mixture as an experiment.

Very often, the result of the work is its own manufacturing secrets. Of course, proportions must be observed, otherwise the kokedama will fail. The height of the flower should not exceed the height of the moss ball by more than 1,5 times. The pallet must also match the diameter of the kokedama and not exceed a quarter of the height of the earth globe.
Any flower can be planted – be it a picky fern or a demanding orchid. It is best to choose a young outlet so that the plant acclimatizes faster. The kokedama looks gorgeous with davallia, which eventually wraps around the ball. The plant in this form can be placed in a beautiful vessel or hung. In the second case, you can show your imagination, and you will get a whole suspended theater of flowers.

The plant must be chosen strong and healthy, which has active and young rhizomes. If the roots are too long, cut off half so as not to harm the flower. In a word, making kokedama should not be difficult. At first, you may spend more time, but the result is worth it. Next, we will talk in detail about the principles of manufacturing.
Video “Master class on creating kokedama”
Video about the art of kokedama, how to make kokedama with your own hands.
How to make yourself
What will you need?
To make kokedama with our own hands, we need Japanese black peat. It is not sold on the market, and it is not cheap, so let’s try to replace it with a soil mixture prepared by ourselves.
Let’s take horse peat, which is always freely available at specialized retail outlets, and black cosmetic clay, which we can easily buy at a pharmacy kiosk. Both components are taken in equal parts.
The next thing we need is a granular soil for bonsai – akadama. Of course, in order to save money, you can take garden soil, but Akadama is better.
The next component is sphagnum moss, which we buy without problems at any flower shop, but can also be collected in the forest. Perhaps the latter option will be more reliable.
The top of the kokedama is covered with green moss. To make the finished masterpiece look organic, you need to tear the same moss.

As for plants, here you can give the opportunity for a flight of fancy: what you want, and how much you want (if only they fit in). The best option is ferns and plants that love moisture and shade.
You should also stock up on cotton threads (any color), fishing line, scissors. Also prepare containers: for mixing the soil, soaking sphagnum and akadama. To keep your hands clean, take surgical gloves.
Instruction for manufacturing
Before proceeding with the manufacture, we will prepare the moss and akadama. Moss collected, for example, in the park, is thoroughly washed with distilled water, placed in a tray, covered with a film on top. Akadamu for 24 hours is immersed in settled water. Before starting work, drain the water and dry it for two hours.
So, we begin a master class on making kokedama.
We soak the sphagnum. In the meantime, mix peat, clay and akadama in a ratio of 2:2:3. Adding liquid, knead to make the mass elastic. We clean the roots of the plants that we will use from the old soil mixture and wrap them with sphagnum.

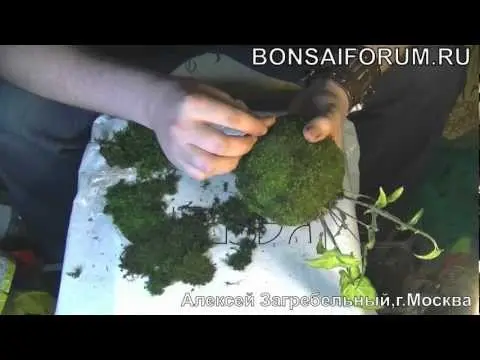
Around the roots, we begin to stick the soil until we achieve a spherical shape. We sculpt with our hands, press to release the air gap and compact the earthen ball. Choose a solid surface and place the ball on it. Lightly press down on it to make it stable.
We stick around the ball with soaked sphagnum and attach it to the surface with the help of a thread. Do not be greedy, overlay and wrap with thread. Do more turns – so the lump will be denser.

We put green moss on top of the finished ball and wrap it with fishing line. We complete the process with the last turn, with which we fix the fishing line with knots at the bottom of the ball. Don’t be upset that you can see it. In just a few days, the moss will grow up and close the fixation from the fishing line. Immerse the finished kokedama in water for 20 minutes. Then put on a deep tray so that the moss is always wet. This is now her permanent residence.
How to care for such a handmade masterpiece? It must also be watered by immersion in liquid for 20 minutes. Moss is often sprayed, then it will be fresh and bright. If necessary, you can even replace it with a new one. If the ball has become light, this is a signal that you need to drink it. Trim every two weeks to make it grow even thicker. Once every 14 days, apply a special top dressing through spraying. Good fertilizer for orchids.