Contents
Regular and timely moistening of the soil in the garden is an important component of plant growth and development. The modern development of irrigation technologies and systems offers owners of suburban areas a fairly wide range of accessories for arranging drip irrigation. Moreover, their installation is not so difficult to do with your own hands.
How the system works
The principle of operation of drip irrigation is to directly moisten the root zone of the plant with a portion of moisture. At the same time, water is regularly supplied to the roots in small doses, so the soil does not become waterlogged and does not dry out. Such irrigation can be successfully applied to crops growing in a garden in an open field, grown in greenhouses, plants, shrubs, flower beds, hedges, trees or complex lawns.

Drip irrigation contributes to economical water consumption, allows you to optimally apply soluble top dressings and fertilizers to the soil, moisture is distributed evenly and does not penetrate into neighboring areas, and a crust does not form on the soil surface after irrigation. The system of such irrigation is installed on the surface of the soil without any excavation. Do-it-yourself installation does not require specific skills. At the end of the season, it is easy to dismantle. The use of appropriate controllers allows you to organize automatic drip irrigation, which is very convenient in the absence of owners on the site for a long time.
Design
Do-it-yourself arrangement of drip irrigation systems should begin with the development of the project. To begin with, you should make a schematic plan for the placement of beds or individual plants in need of irrigation and indicate the location of the source of water supply. Then you need to experimentally measure the performance of the source. This is done by determining the filling time of a container of known volume. For example, a bucket of 10 liters is taken, and if it is filled in 1.5 minutes, then the productivity of the source is (10:1.5) x 60 = 400 l / h. That is, drip irrigation mounted on the site with their own hands will not be able to use more water.

After that, the amount of water that will be consumed per hour is calculated. To do this, the number of droppers is multiplied by their standard consumption. For example, drip irrigation is planned to be done on 300 droppers with a flow rate of 2 l/hour. Then within an hour you need to supply 2 x 300 = 600 liters of water. Irrigation with a hose with built-in drippers requires knowledge of the distance between them and the total length for calculation. So, if droppers with a flow rate of 1.15 l / h at a distance of 30 cm and a hose length of 120 meters, then the water requirements will be (120: 0.3) x 1.15 u460d XNUMX l / h.
If the source cannot provide the required consumption, then for drip irrigation systems it is necessary to allocate several separate zones where water is supplied in turn at different times. Or use hoses with a large distance between drippers. Based on the needs of specific plants and the consumption of droppers, the duration of drip irrigation is calculated. For example, tomatoes need 1.5 liters of water per day, then a system of drippers with a flow rate of 1.15 l / h should work for 1 hour 20 minutes (1.5 l: 1.15 l / h). If a do-it-yourself drip irrigation system provides for the intake of water from a plastic container, then knowing the productivity of the source and the irrigation time allows you to calculate the time of its emptying and select the desired volume.

It should also be noted that when installing drip irrigation with your own hands, you should take into account the length of the hoses used. Since the water pressure drops due to friction against the walls, even a single dropper will not be able to function at the end of a very long hose. When calculating, the maximum length of the hoses, which is determined from the tables of technical data, must be taken into account.
Video “How to make drip irrigation yourself”
Video instruction for the construction of a drip irrigation system.

What materials and tools will be required
Do-it-yourself installation of drip irrigation will require the purchase of a certain type of components, the number of which is determined by the calculations of a preliminary draft. Since the system is installed on the surface of the soil, a knife and a punch will be required from the tools in order to cut the supply hose or tape into segments and make holes for drippers in them. Droppers should have a water flow according to the needs of plants and their number is determined by calculations. Drip irrigation is impossible without a main hose and thinner hoses or tapes that supply water to droppers. To combine them into a single system, connecting and shutoff valves are used. Equipping drip irrigation with their own hands, as a rule, they use a plastic container and a submersible pump to supply water of a certain volume. Using the controller will allow you to organize automatic mode for operation.

The installation process
Since different crops are planted at different times, the installation of the main elements of drip irrigation systems can begin in April and, as the irrigated area expands, connect the elements required for irrigation. Installation begins with the installation of a water supply tank. It should be plastic, as even a small stain of rust will clog the drippers and the system will no longer function properly. The tank contains a submersible pump. If you install a programmable controller for its operation, then we get automatic drip irrigation.
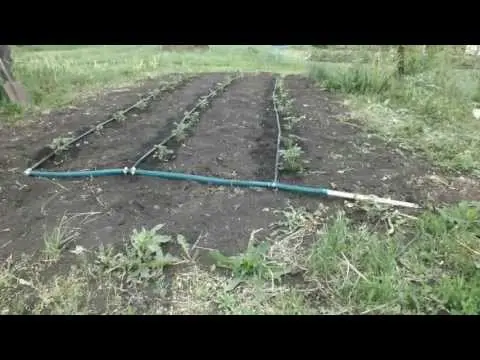
The main hose supplying the system is connected to the tank. To do this, a tie-in is made 10 cm above the bottom level so that the debris accumulating at the bottom does not fall into the hoses that provide drip irrigation. Also, a filter must be installed at the hose connection. With the help of starting fittings, supply hoses or tapes are connected to the main.

Carrying out further installation with your own hands, you should make holes for droppers in the supply hoses at the right distance. Then the laid hoses are fixed with special pegs, placing the droppers closer to the plants. Plugs are installed at the free ends of the hoses.
After completing the installation, the assembled system should be tested. To do this, remove the plugs at the ends of the supply hoses and turn on the water. Such flushing is sometimes necessary during the period of active operation. As you can see, installing drip irrigation on the site with your own hands is quite simple.
Video “All you need to know about drip irrigation”
In this video you can hear details about drip irrigation and tips on how to do it.