


Contents
In this article, I’ll show you how to create a grouped column chart or grouped bar chart that shows the difference between two data series.
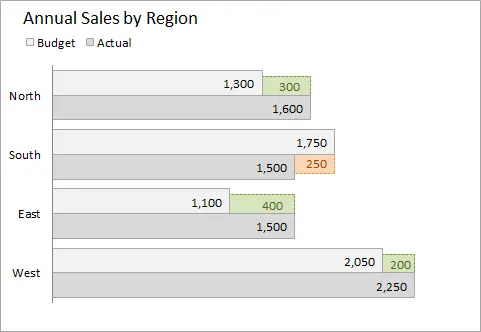
Histogram with grouping and displaying the difference:
Grouped bar chart with difference display:
Review
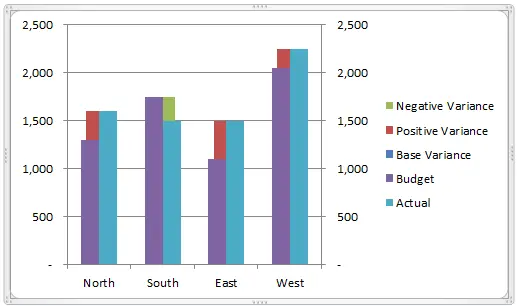
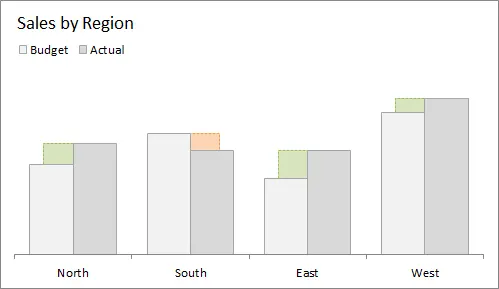
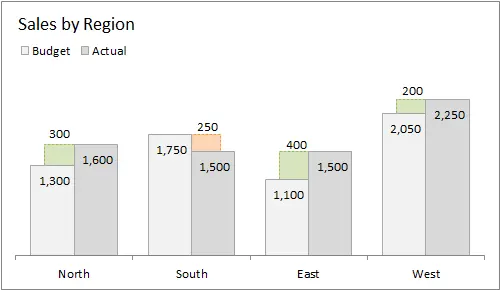
A grouped column chart or a grouped bar chart is a great solution when you need to compare two data series across multiple categories. In the example above, we are comparing Plan (Budget) и Fact (Actual) across multiple regions. The standard grouping chart shows the totals in each row by category, but does not provide information about the difference. The user is forced to calculate the difference himself.
However, using some advanced charting techniques, the difference can be easily plotted.
Data Requirements
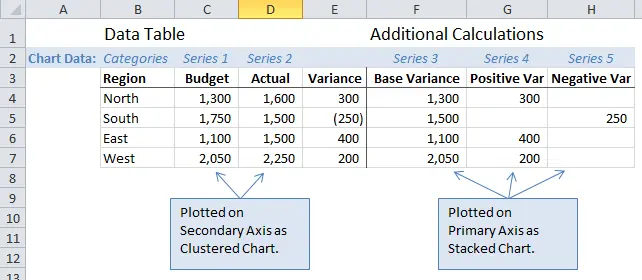
For any chart, it is very important to create the right data structure before you start plotting. The figure below shows how the data should be organized on the worksheet. This is a simple report form with one column containing category names (Region) and two columns for data series (Budget and Actual).
This method is suitable for comparing only two data series. You can compare data of any type: plan and fact, last year and current year, sale price and full price, men and women, and so on. The number of categories is limited only by the size of the diagram, but usually no more than five categories are taken for ease of perception.
Chart Requirements
Two types of graphs are used to build a chart: grouped and stacked. The two data series we are comparing (plan and actual) are shown in a grouping chart, and the difference is shown in a stacked chart.
The chart uses two different axes: the compared data series are built on the secondary axis, and the difference is on the main one. As a result, the stacked chart (difference) is positioned behind the grouped chart (plan and actual).
How it is done
Data calculation
First of all, we add three columns with calculations to the data table.
- Starting point the differences (Base Variance) – the starting point for plotting the difference is calculated as the minimum value of the two data sets in each row of the table.
=МИН(C4:D4)=MIN(C4:D4)This is how we get the value to build the baseline of the stacked chart. This part of the graph will be hidden behind the grouped chart.


- positivei’m the difference (Positive Var) – calculated as the difference between series 1 and series 2 (actual and budget), and is plotted as a positive result.
=ЕСЛИ(E4>0;E4;"")=IF(E4>0,E4,"")Condition IF (IF) returns null if the difference is negative. An empty value and a label for it will not be shown on the chart.

- negativei’m the difference (Negative Var) – same simple calculation as in the case of a positive difference, but in order to get a positive value with a negative difference, we used the function to calculate the modulus of a number ABS.
=ЕСЛИ(E5=IF(E5A negative difference must be plotted as a positive value to fill the gap between the two data series. Calculating it in a separate column will allow us to give negative values a different fill color so that the user can easily distinguish them from positive difference values.

How to create a chart
Stacked and grouped charts are created in the same way. Building a diagram is quite simple, and you can learn a few interesting tricks from it.
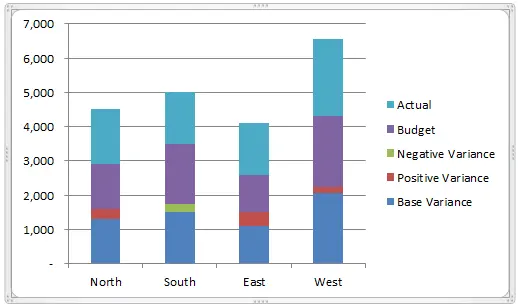
- First of all, we create a stacked histogram and plot five data series in it.
- Row 1 (Current) i Row 2 (Budget) must be plotted along the minor axis. Right click on a data series column Present on the chart and click Data series format (Format Data Series).
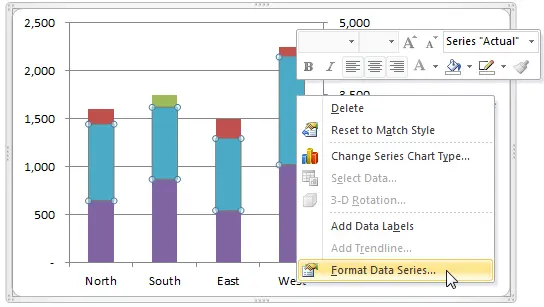 In the settings section Row Options (Series Options) check the box Build a row (Plot Series On) to position Minor Axis (Secondary Axis).
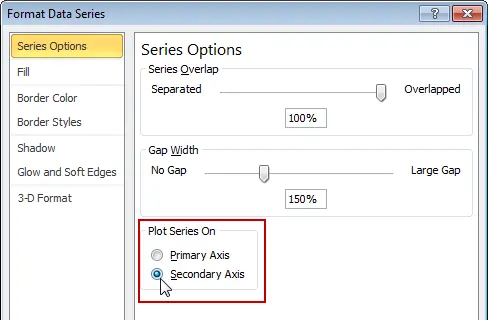
Repeat this operation for the data series Budget.
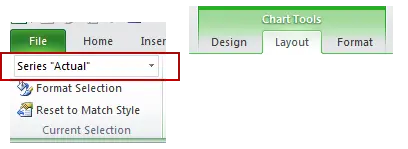
- For data series 1 and 2, change the chart type to Histogram with grouping (Clustered Column). Select a series of data Present on the chart or in the dropdown list Chart elements (Chart Elements), which is on the tab Layout (Layout) in section current fragment (Current selection). The chart must be selected so that the tab group Working with charts (Chart Tools) appeared on the Ribbon.
 On the Advanced tab Constructor (Design) click Change chart type (Change Chart Type) and select the type Histogram with grouping (Clustered Column).
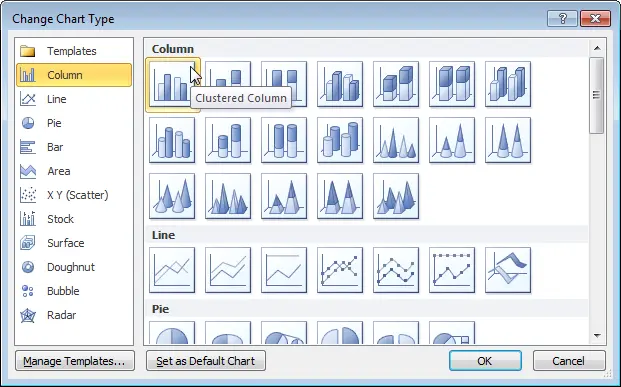
From this point on, you can see how our diagram begins to take shape. Data Series Present (Fact) and Budget (Plan) are now shown as columns side by side for easy comparison. The data series showing the difference is visible behind as a stacked column.
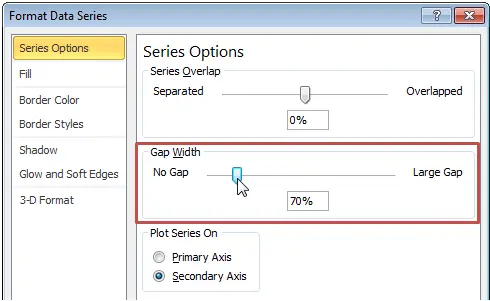
- In the dialog box Data series format (Format Data Series) under Row Options (Series Options) Customize Side clearance (Gap Width) for both charts. This setting controls the spacing between columns. Decrease its value, and the width of the columns will increase, and the gap between categories will decrease.
- Set up the chart format. The default formatting settings do not look very attractive. We can fix a few things to make our chart more presentable:
- Let's move the legend to the top of the chart area and remove 3 positions with a difference from it.
- Let's add a title to the chart.
- Remove axis labels.
- Set the border and fill colors for the columns.
- Let's remove the horizontal grid lines.
- Adding data labels. Columns with a difference in the data table are formatted to display an empty cell instead of zeros:
_(* # ##0_);_(* (# ##0);_(* ""_);_(@_)_(* #,##0_);_(* (#,##0);_(* ""_);_(@_)With these settings, empty cells are not displayed on the chart, which gives it a neat look. Otherwise, columns with a margin of zero would have data labels.
The data labels for the stacked bar chart do not have an option to display them above the graph, so you have to manually move the labels up and to the left or right of the column.
To sum up
The above chart is a great way to present the data series and the magnitude of the difference in one graph. The purpose of this tutorial is to show how to build such a graph and adjust its parameters to make the data understandable and accessible to the user. The table used to create the chart is simple in structure and can be used with different types of data, i.e. there is no need to repeat the entire creation process from start to finish.
What do you think of what you read? Maybe you are using a different chart type to show the difference?
Leave comments!