


Contents
Kolodnoe beekeeping has its roots in the distant past. With the advent of hives, the technology lost popularity, but did not remain forgotten. Inveterate beekeepers began to revive the old method of keeping bees, assuring that the most delicious honey is obtained in decks.
The history of the emergence of deck beekeeping
The technology of deck beekeeping originated at the beginning of the 17th century. The beginning of the development of industry, the construction of cities, ships provoked massive deforestation. Wood was the main universal building material. To save the board and the hollow with bees, the beekeepers took them to their yard, setting them closer to their homes. Over time, it took an increase in beekeeping. The beekeepers found trees with a hollow, sawed the log lengthwise into two halves. The ridges were cleaned from the inner core, crosses were installed to fix the combs.
After do-it-yourself re-equipment, the hive-deck was ready to be climbed up a tree, but it is difficult to do such work. The decks began to be placed on the ground in groups, choosing for them forest clearings on a hill. Preference was given to places where there were cut trees. From here, deck beekeeping acquired the name “poseka”, and later the word “apiary” appeared, which has survived to this day.
Care for bee colonies in the deck and the board is almost the same. Swarm beekeeping cannot be adjusted in a non-collapsible deck. The house was cut into several parts. A new look was born on deck beekeeping – a collapsible deck, where the upper removable circles played the role of a honey store.
However, the development of the technology of deck keeping of bees did not stop there. The small internal volume of the log house led to frequent swarming of bees. Beekeepers have mastered the technique of piece swarming, learned how to make layering. Over time, they began to select a swarm bee to strengthen weak families.
Insects only benefited from this. With the advent of collapsible log hives, man has stepped up his intervention in the natural process. The life of bees has become more complicated.
Advantages of breeding bees in decks
It is undesirable to recommend deck beekeeping for beginner beekeepers because of the complexity of the technology. It is wiser to start with beehives. On the other hand, keeping bees in decks has many advantages:
- In terms of environmental cleanliness, the beehive-deck outperforms the modern house. In deck beekeeping, artificial materials and chemicals are not used to control pests.
- In deck hives, bees are less likely to smoke with a smoker, they are less disturbed. Insects are much quieter. Deck houses can be placed in the yard without fear of bees attacking people.
- The absence of a framework provides freedom of action for insects. The bees fill the deck with honeycombs at their discretion. Natural housing reduces the risk of insect diseases, the Pomor is reduced. Improves the taste of honey. Bees are better adapted to weather conditions.
- Kolodnoe beekeeping requires a minimum of costs. There is no need to buy frames, food and some other equipment that is in demand for an apiary from beehives.
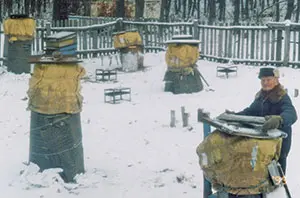
- For wintering, deck hives do not require a omshannik. Bees hibernate outside, creating an optimal microclimate inside the house.
- Collecting honey in decks causes less damage to bees. Insects take only part of the combs. The nest of bees is not disturbed. Honey is left in the hive for winter food.
If the advantages are convincing, then making a deck for bees can still be recommended even to beginners.
Deck device
There are three types of deck hives:
- vertical model;
- inclined bed;
- multilayer collapsible model.
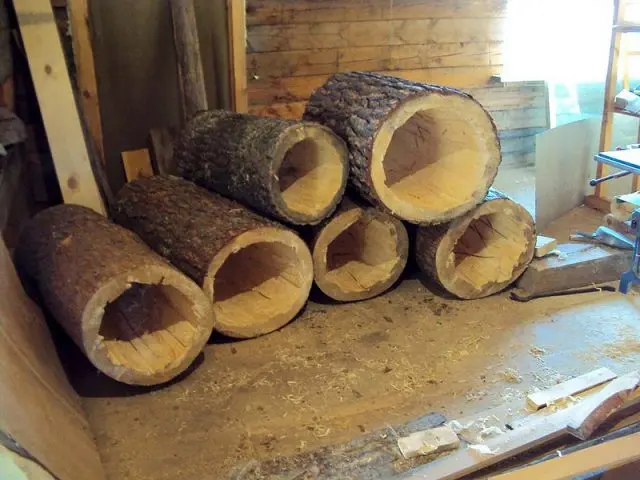
The vertical model in design resembles a board. A log up to 2 m long and at least 50 cm thick is cleaned from the core. The thickness of the walls of the log hive is about 5 cm. The lower and upper holes of the log are closed with lids.
The lounger is similarly made of logs. Sometimes a log house is knocked down from boards in the form of a parallelepiped. The difference between a sunbed and a vertical model is the location. The structure is laid horizontally on stands at an angle of 30 о.
The multi-tiered model is assembled from collapsible sections. The amount depends on the intensity of the honey collection and the conditions of the area. Usually there are 4 or 5 tiers in a deck. The inner diameter of each section is a maximum of 30 cm. The height of one tier is the same size. Inside each section, 7-9 plastic rulers 4 mm thick, 15 mm wide are inserted. All plates are covered with wax.
Deck beekeeping does not involve the use of frames. Honey bees contain wax. However, there is a modern hive deck with frames, called “Combi”. It consists of the following parts:
- bottom;
- deck body;
- the body of the Dadan hive, containing 12 frames;
- liner;
- a gable roof structure, most often sheathed with galvanized steel.
Assemble “Combi” from a tongue-and-groove board 35 mm thick. The wood used is coniferous.
How to make a deck for bees with your own hands
If there is a desire to do deck beekeeping, the beekeeper should know the structure of the deck and the parameters. The blank is a log 2 m long. The outer thickness is selected so that the diameter of the inner space is 30-40 cm with a wall thickness of 5 cm. Only dry wood is used, preferably from hardwood.
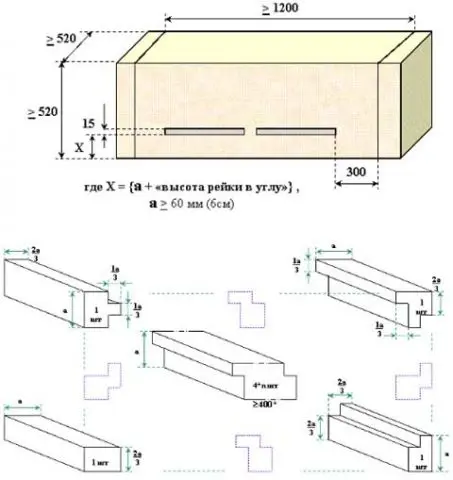
It is sometimes difficult to find a suitable log. The way out of the situation is a deck for bees from boards, which has a rectangular shape on the outside. Inside, the corners are smoothed with triangular slats to make a round section. The height of deck houses from boards is 120 cm.
Drawings, tools and materials
To make a deck, you will need a woodworking tool: an ax, a hand saw, chisels, a chainsaw, a planer. If the structure is made of boards, a woodworking machine is needed.
A diagram of a log hive from a log is not needed. There is nothing difficult about dissolving the workpiece and choosing the core. When making decks for bees from boards with your own hands, drawings are a must. A good option is a sunbed with two entrances, shown in the diagram.
Build and install process
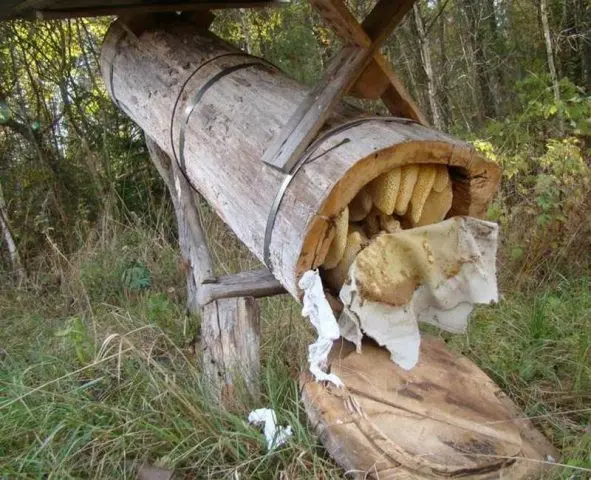
For the manufacture of a classic deck of logs, a tree trunk is selected of suitable sizes. The workpiece is split lengthwise into two parts. The middle is chosen until the wall thickness of 5 cm remains. The blanks are left in the shade for further drying. From the remains of the tree trunk, 2 circular cuts are cut. They will serve as the lid and bottom of the bee hive.
When the two blanks are dry, they are combined into a log. On one of the seams there will be a notch on the deck, so a gap is cut in advance. In height, it is located above 3 cm from the bottom and goes up to the ceiling. The total length of the notch is ¾ of the height of the log.
The halves of the log should be tightly lapped so that no gaps remain at the seams. The roof is adjusted in the same way. The saw cut to the log hive is nailed with wooden nails, having previously drilled holes. It is advisable to cover the inner plane of the ceiling with a cloth so that the bees do not attach honeycombs to it. The bottom from the second round cut is fastened with loops. It must open to extract honey. Inside the structure, one cross is placed under the ceiling, and the second is approximately in the center. On this, a deck for bees is assembled with your own hands, you can install it in a prepared place.

A modern deck house for Shapkin’s bees is assembled from a board. The design is hexagonal. The bottom and ceiling are made opening. The through passage simplifies the excavation of honeycombs along the entire length.
The complexity of manufacturing the structure lies in the need to cut the lock joints on the boards. You will need a special machine. To simplify the process, amateur beekeepers make Shapkin’s model from plywood. The elements are connected with rails, and foam is used to insulate the walls.
In the video, an example of a homemade deck hive:

Rules for keeping bees in decks
Before settling the bees inside the deck hive, slats are installed. The quantity depends on the internal dimensions of the case. The distance between the slats is kept the same as between the honeycomb frames in a conventional hive. Crosses are attached to the walls. They are held by hammered nails or nailed wooden blocks.
The main rule for keeping bees in a deck is the obligatory updating of the nest. If this is not done, the size of the cells decreases over time. New bees are born small, the productivity of the bee colony decreases. For 3 or 4 years, the family is sent in the fall to spend the winter in a regular hive. The inside of the deck hive is cleaned, prepared, and in the spring the bees are returned back to their homes.
Bees in deck houses are examined no more than 3 times per season. The first inspection in the spring is associated with checking the family, feeding. During the second inspection, honeycombs are cut off. The third inspection is preparatory for winter.
Conclusion
Deck beekeeping allows beginners to start apiary from scratch. Buying a hive is expensive, but cutting a log deck is free. You just need to put in the effort and have the desire.