


Contents
If you have to work with an Excel workbook that constantly contains the same list of data, or maybe you just don’t want to use the action multiple times Copy > Insert, it would be very convenient to have a pre-configured and saved list so that Excel can help you with your work. Using custom lists is a good solution for this situation. Next, I will show you how to create a custom list in Excel.
Create a custom list in Excel
I will demonstrate this with the example of a list of school clubs. I need to keep track of the money on the balance of each of them, as well as outline a daily budget. I started by entering the names of the clubs – this is the information that I will need all the time.
At this point I would also run a spell checker, this is done with a simple click F7.
Then I selected this area, clicked on the button Office and at the bottom of the menu that opens, click on Excel Options (Excel Options).
In section Popular (General) You will find the item Create lists for use in sorts and fills sequences (Create lists for sorting and filling) – click on Edit Custom Lists (Change lists).

If you are working in Excel 2010, then you need a different route. Open a tab Fillet (File) and click Options (Options). Then scroll down, find the button Edit Custom Lists (Change lists).
Next, a dialog box will open in which you can add information that you plan to use repeatedly. If you look at the lists already prepared by Microsoft, you will see among them the ones that everyone uses so often. They cannot be changed or removed. However, if you wish to delete or change the list you have created, you can do so at any time. To do this, click on your list and do with it what you want.
Building a list from scratch
I have two ways how to create a custom list. I can create it manually by entering each value in the field List entries (List items) and pressing Add (Add). If you choose this path, you will encounter some limitations. Field List entries (List Items) allows you to enter up to 255 characters. Be careful how many characters each of your entries consists of!
Tip: If you plan to enter a list in the field List entries (List items) manually, do not put extra spaces between items. If there are spaces before or after the element, then Microsoft simply will not take them into account, and if between the words of one element, then all of them will be saved.
Create a list from an existing data range
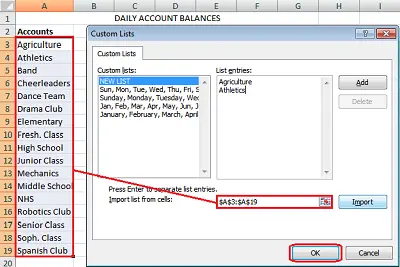
Another way to add items to a custom list is to import data. If you select them before opening the menu window, the selected range will automatically be inserted into the corresponding field. You will only have to press Import (Import) and Excel will create a list from the text contained in the cells. If you have not selected the text in advance, put the cursor in the field next to the button Import (Import) and select the data cells for the new list.
Remember, we had a limit on the number of characters that can be entered in the field List entries (list items)? Only not when importing! Now the maximum list size is about 2000 characters! Click OKto close the window with list options, and again OKto close the Excel Options window.
For a custom list, only text values can be imported. If you need to create a custom list with calendar dates or numbers, you will have to use the field List entries (List items).
Here are some things you should know about custom lists… All lists are linked to your computer. Their settings are saved on the computer you are currently working on. If you take a file from your work computer to work with it at home, you will have to create the same user list again on your home computer. If you used a custom list to do the sorting, then its elements will remain in the Excel cells, but it will not be shown among the lists.
Using custom lists in Excel
So, our custom list is ready to use. Select a cell and enter any element of this list from the keyboard. Click on the autocomplete marker (the small square in the lower right corner of the cell) and drag it to continue the sequence. A little to the right, I entered “Monday”, then clicked on the marker and dragged to the right, Excel filled in the cells automatically.
The great thing about this feature is that Excel will fill both the column and the row the same, both forward and backward, whether you start from the first element of the list, from the middle, or from the last element… As soon as you click and start dragging mouse, Excel will figure out what you want to do and insert the appropriate data.

Sort by custom list
One of the nice things about working with custom lists is the ability to organize your data according to any of the lists you have stored on your computer. Click on one or more columns, then click Sort & Filter (Sort & Filter), expand the dropdown menu Order (Order), click Custom List (Custom List) and select the list you want to sort by.
A sort can include more than one column. If you want to add another level and sort first by month and then by account number, you can click Add Level (Add Level) and define how the data should be displayed. When you’re done, click OK. Now the information is sorted according to the selected list!

Everything is quite simple! The use of custom lists is very convenient, especially for those who want to avoid copying and pasting data multiple times. If you know that there is a set of data that you might need at any time, why not make a custom list out of it? Who knows, it might save you a lot more time than you might think… and leave your boss feeling like you’ve had to work hard. Let him think so.
Enjoy it!