


Contents
Excel is an amazing application that can do more than just spreadsheets. For example, generate barcodes. To do this, you need to use a special file with which you can create a sufficient number of barcodes and print them.
Barcode generator
The Barcode Generator is a small Excel executable that allows you to create barcodes based on the data in a table. It is enough to download it, install a special font, and after that you can get to work. But first you need to understand in general what barcodes are and how they work from a scientific point of view, so to speak.
Goods barcoding systems, barcode numbers
For an ordinary person, there is no fundamental difference between different barcoding systems for goods. However, the standard one is the one with the EAN13 code. The first three letters at the beginning mean European Article Number, which translates as “European Product Code”. However, this system is used not only by European countries, but everywhere. The structure of this type of barcode is as follows. It consists of thirteen digits, which are divided into several blocks:
- The first three of them indicate the country of origin. So, according to the code 460-469, we understand that the product was manufactured in Our Country.
- Then there are four numbers that indicate the manufacturer of this product.
- The five digits that follow them indicate the product code according to the classification system that was developed by the organization that offers this product.
- The last number is calculated according to a certain mechanism and is needed as a control.
Thus, the barcode algorithm is very clear and you cannot invent it yourself. If you try to use a barcode scanner, it will give an error, because the algorithm is designed based on the existing standard.
Some barcodes are not classified in the manner described above. For example, products can be packaged, and then the barcode starts with the number 2. Also, a fairly popular barcode format that is used for other purposes is the QR code. With it, you can encrypt any information.
Download barcode generator
So, to generate barcodes in Excel, you need to download a special file (it’s completely free) and open it. The downloaded archive will contain three files:
- Instruction. Here is an instruction on how to use the barcode generator. You can not open it if you carefully read this article.
- ean13.ttf. This is the font that needs to be installed before creating the barcode.
- Barcode generator.xls – a document that allows you to generate a barcode.
After downloading the archive, you need to unpack it, and then install the font required to complete our task. The barcode generator itself is located at this link. https://www.tirika.ru/files/generator-shtrih-kodov.zip
Installing the EAN13.ttf font on Windows
The sequence of steps required to install a font is slightly different. Recent versions of Windows do not have a dedicated button for adding a font, so this must be done by another method.
Windows XP, earlier OS versions
So, if you have a Windows XP operating system, you need to perform the following steps:
- Click on the “Start” button, and then go to the Control Panel. In it you need to find the “Fonts” button and click on it.
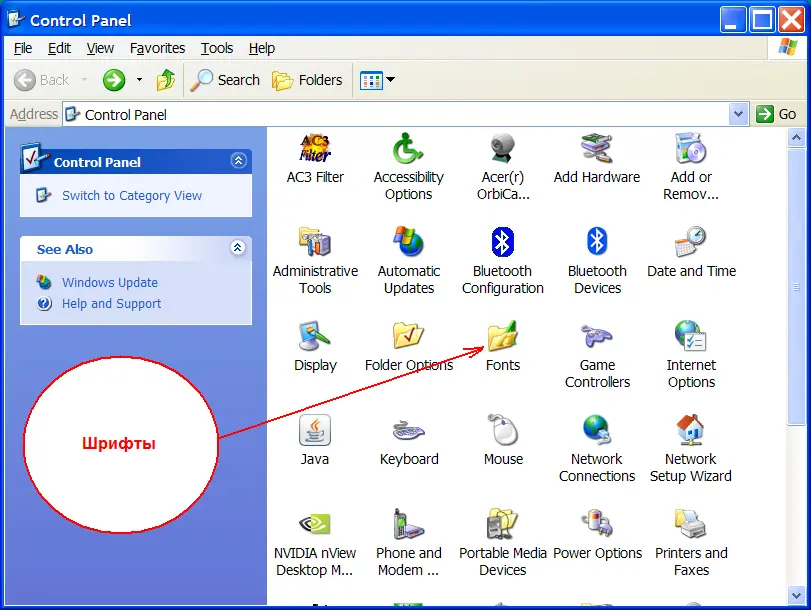

- Next, a window with fonts will open before your eyes. In it you need to find the “Add a new font” button and select our font file in the folder where the archive downloaded at the previous stage was unpacked.
Windows 7, Windows Vista
If you have Windows Vista or older, there is no “Add Font” button in the font selection dialog. Therefore, it must be copied into the list of fonts manually. To do this, open the explorer and drag it there in the same way as in any other folder.
Launching the barcode generator and using it
Our font is now installed on Windows. After that, you can start generating barcodes using the file of the same name in the unpacked archive. At this stage, the user may experience such a problem.
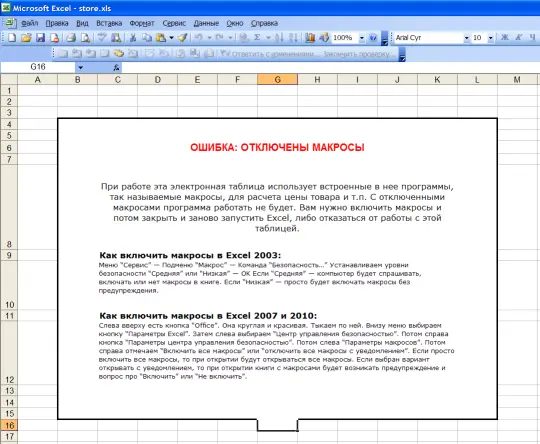
By default, for all documents downloaded from the Internet, Excel automatically disables macros because they may contain malicious code. The fact is that Excel not only knows how to create spreadsheets, but also supports full-fledged programming. The language in which these mini-applications are developed is called VBA, which stands for Visual Basic for Applications. Actually, a macro is a program written in this language. With their help, you can implement almost any Wishlist in spreadsheets. But some users develop bad software modules, so Excel developers have disabled them by default.
The file downloaded earlier is also a program written for Microsoft Excel. There is no malicious code here, so you can safely allow the application to open these executable modules. If you still do not really trust macros downloaded from unknown sources, then you can simply delete this file. If they are not enabled, it will not work. If you trust the file, then activate the macros, after which you need to specify a number of simple settings. 
Let’s take a look at these options in more detail:
- How many barcodes to create. Here you need to specify the number of codes that we need to print. For example, we need 100 pieces. This is how much we put into the cell.
- The number of the first barcode. After starting the program, it is recommended to write the number 1, since it is from this number that the barcodes will be numbered. If 100 pieces have already been made earlier, then you can write the number 101 as the first number, after which all the following barcodes will be numbered from this number.
- Barcode prefix. The user can create barcodes ranging between 200 and 299, which are intended for more arbitrary product labeling. For example, you can set code 200 for products and 299 for discount cards. With this setting, the user can create separate codes for specific types of customer needs.
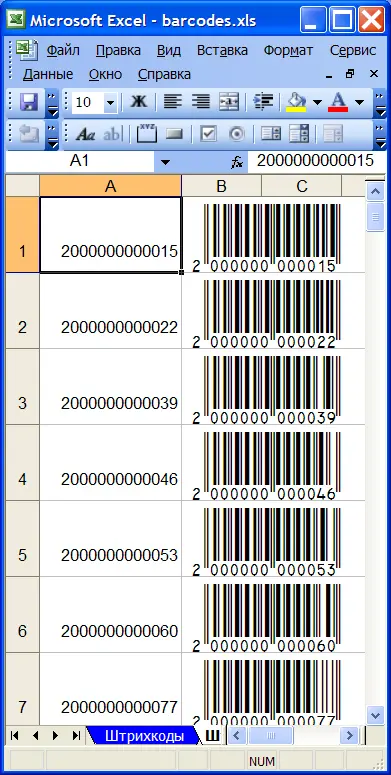
After entering the parameters of the barcode generator, we need to click on the “Create barcodes” button. This will create a separate sheet that will list our barcodes in the first column. All fonts will be drawn using the previously set font.
Further, this page can be printed, and then it can be deleted. If, for one reason or another, barcodes turn out to be unnecessary, they can be removed earlier, since they can always be generated again. Why take up extra disk space?
How does this generator work? After the user clicks the “Create Barcodes” button, a new sheet is created, and one of the columns is filled with the generated barcodes. To do this, the program first processes the information that was specified by the user at the settings stage. To create the first picture, the prefix that the user specified is taken first, after which it adds the first number to it, and then adds a certain number of zeros. How much is inserted is determined in such a way that a numeric sequence of 12 characters is obtained. After that, the last digit is calculated, which, as we remember, is generated by a certain algorithm.
As a result, a 13-character number appears, written in the first cell of the first column of the sheet that was created by the program, after which it is added to cell B1, and the EAN13 font is set for the cell. After performing these steps, the second barcode is created, which is performed according to the same algorithm. The only exception is that the number increases by one from the previous one. If at first it was 1, then – 2, and so on.
The algorithm is executed until the required number of barcodes is generated. Then the generated sheet appears in front of the user, and he can print the barcodes that came out.
How to make your own barcode generator in Excel
But what if we do not want to use other people’s executable modules, but we want to be able to make such codes ourselves? There are many methods for doing this: creating your own Excel routine, a specialized Active X tool, and downloading modules created by other users.
To begin with, we can install a special font. There are several fonts – not only the one we downloaded earlier. Also at this address you can find a special add-on designed to achieve the task. http://www.idautomation.com/font-encoders/word-excel-addin/.
Now we need to make sure that Visual Basic has been activated. Well, turn on the macro so as not to reinvent the wheel, but create it yourself, but using ready-made tools. To do this, perform the following sequence of actions:
- Go to http://www.idautomation.com/font-encoders/vba-macro/ and find the “VBA Macros for Excel & Access” executable there.

- After that, download the file from the link that is on this page.
- Next, the archive will be downloaded, which must be unzipped.
- After that, open the Visual Basic Editor using the Alt + F11 key combination. At the top there will be a field in which we need to click on the “File” button. Using the “Import file” menu, we need to find the file that we downloaded in the previous steps through a special dialog box and open it. It is called IDAutomation.bas.
- With this module, the program adds all the necessary components to create barcodes.
- It can be found in the “Modules” folder.
- Next, we go to a regular sheet, after which we write the code in the cell. After that, we activate the macro through the “Developer” item and run it.
- We have generated an 8 digit barcode. There is also another macro that contains 13 characters. It is inserted and executed in the same way.
Then we just need to print the barcode and check it. Don’t forget to make sure you’re using the correct fonts before doing this.
The process of creating a barcode in Excel step by step
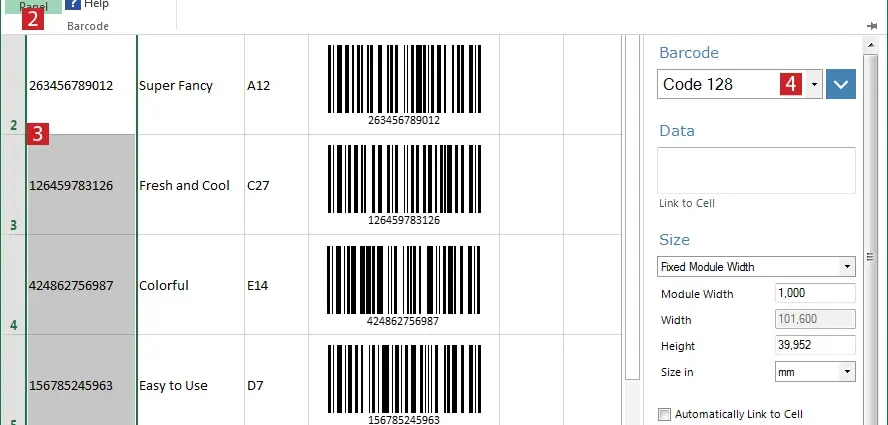
There is another method for creating a barcode in Excel – creating your own macro. You can also add an Active X control. In Excel 2007 and later, this is done as follows:
- Go to the “Options” section, which is located in the “File” menu. We activate the function of displaying the “Developer” tab (you need to check the corresponding box).
- If we did everything correctly, the “Developer” tab should appear in front of us. There we are looking for the “Insert” button. The menu will appear. In it, select “ActiveX Controls”. After that, another submenu will appear, where we are interested in the “Other controls” item.
- If the corresponding element is installed on the computer, we need to find the StrokeScribe Object. After that, left click on the “OK” button.
- Next, you need to put the object on the sheet. To do this, you need to draw a rectangle on it, the dimensions of which correspond to the dimensions of the object that should be on the sheet.
- After that, a barcode will appear on the page, which we can configure through the “Properties” menu.
If you need to make it change depending on which numbers will be entered by the user, you need to write code.
Thus, this procedure is not as complicated as it might seem at first glance. Everything has already been done for the user by caring programmers. You can download a standalone macro file that you can use in your own workbook, or you can use an Active X control and create your own macro. However, the latter method is quite advanced and therefore requires special skills. And in order to develop them, you need to study the theory, which will be the subject of a separate article.