Contents
Clematis Tudor belongs to the varieties of German selection. It was bred in 2009, the originator of the variety is Will Straver. Clematis is large-flowered, early, characterized by long, abundant flowering, unpretentious care and frost resistance.
Description of clematis Tudor
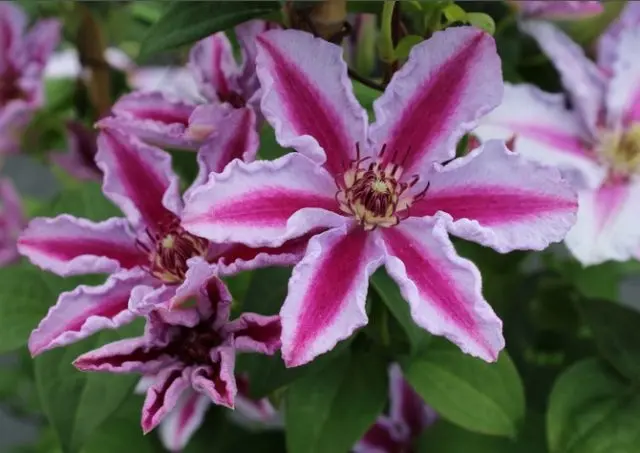
Large-flowered clematis Tudor, named after the English royal dynasty, looks majestic. Pale purple flowers with longitudinal, purple stripes down the middle of the petals are reminiscent of the Tudor family crest. The diameter of the corollas is from 8 to 12 cm. The flowers have 6 petals, purple anthers on snow-white legs are located in the center.
The bush is compact, low, the maximum height of the shoots is 1,5-2 m. It blooms twice, the first time – from May to June, and the second – from July to August. The leaves are pale green, trifoliate. The plant tolerates frosts down to -35 ° C.
Tudor clematis pruning group
According to the description, clematis Tudor belongs to the 2nd pruning group. The first abundant flowering occurs in the spring on the shoots of the previous year. The second time the plant blooms at the end of summer after pruning, on the branches of the current year. In autumn, clematis needs light pruning at a height of 1 m from the ground.
Planting and caring for clematis Tudor
For planting clematis Tudor choose a place protected from the winds and well lit most of the day. The roots of the plant do not like overheating, so the near-stem circle should be in shading. It is covered with mulch, creating shade thanks to decorative crops planted nearby. The plant does not like acidic soil and stagnant water.
The procedure for planting clematis Tudor:
- A hole for clematis is dug large, with a diameter and depth of about 60 cm.
- If the earth is heavy, a drainage layer of 15 cm is made at the bottom and peat is added to loosen it.
- Gravel, expanded clay are used as drainage.
- A deoxidizer and nutrients are added to the soil – rotted compost, bone meal, manure, complex mineral fertilizers.
- A piece of non-woven material that allows water to pass through, or coconut fiber, is placed on top of the drainage layer.
- Then the prepared nutrient soil is poured, leveled and compacted.
- Dig a small hole in the center according to the size of the root system of the container seedling.
- If the plant has an open root system, a small tubercle is made at the bottom of the hole, along which the roots are spread.
- The root neck is buried when planting by 8-10 cm, if all the shoots are lignified, green branches cannot be buried.
- They fall asleep with soil and compact, make a small groove within a radius of 10 cm from the plant.
- A strong support is placed nearby, which will not stagger from the wind; clematis shoots have very fragile wood.
- Water the near-stem circle of a seedling from a watering can.
- Mulch the soil with sawdust or coconut fiber.
- On the sunny side, the seedling is covered with a screen of white non-woven covering material for 1,5 months.
Further care consists in regular watering as the soil dries out, the roots should not suffer from a lack of moisture.
A photo of Tudor clematis flowers, according to reviews, leaves no one indifferent. It blooms at the age of 3 years, after which it requires special pruning. The lashes of flowering specimens are shortened slightly in autumn, at a height of about 1 m from the ground, covered with spruce branches, spunbond or lutrasil on the frame. In the second year of cultivation, fertilizing with complex fertilizers is carried out from April to August.
Preparation for winter

In autumn, the trunk circle of Tudor clematis is covered with mulch. To do this, use peat, humus, leaf litter. After pruning in October, the lashes are removed from the support and an air-dry shelter is built for them, as for roses. Cover with covering material when the air temperature drops to -4 … -5 ° C. The lashes can be rolled into a ring, but then cracks will appear on the bark, it is more convenient to lay them directly on a layer of mulch, coniferous litter or spruce branches.
A layer of mulch is made higher than in spring and summer – about 15 cm. Before closing the bush with spunbond, preventive spraying with Fundazol is carried out.
Reproduction
Clematis Tudor is propagated by dividing the bush, layering and cuttings. When growing seedlings from seeds, varietal characteristics are not transmitted.
Reproduction by dividing the bush:
- Share adult clematis Tudor in September during the autumn transplant.
- To do this, dig a bush around the perimeter. It is important that the shovel is sharp and does not injure the roots.
- The ground is gently shaken off from the root system and the bush is divided into several large seedlings with shoots and renewal buds.
- Delenki are planted immediately in a new place, deepening the root collar.
- Water the near-trunk circle and fall asleep with mulch.
Cuttings for propagation are usually cut in the summer in the first half of June. Young lignified shoots take root better. From one whip, cut off near the ground above a strong kidney, you can get several cuttings with 2-3 internodes. Rooting takes place in a greenhouse at high humidity and an air temperature of + 22 … + 25 ° C.
After seeing the photo and description of Tudor clematis, many will want to purchase its seedlings. It is very easy to propagate the plant by layering. To do this, in the spring, next to the bush, they dig a ditch with a depth of up to 20 cm and a length of up to 1 m. Fill it with a fertile loose substrate with the addition of humus and biohumus. One of the long shoots of clematis is bent down and placed in a prepared ditch, sprinkled with soil, and fixed with wooden or steel slingshots. All summer watered, fed with fertilizers along with the mother bush. Rooted seedlings are separated in the spring or autumn of the following year and transplanted to a new place.
Diseases and pests
It is a pity to lose a beautiful variety of clematis Tudor due to an oversight. Even a healthy plant with strong immunity is sometimes attacked by pests or suffers from fungal diseases.
Of the pests on Tudor clematis, aphids, slugs, spider mites can settle; in winter, mice gnaw shoots under cover. Poisoned grain is used from rodents, slugs are harvested by hand, Fitoverm or other insectoacaricides help in the fight against aphids and spider mites.
Of the fungal diseases on clematis, rust, powdery mildew, gray rot and wilt are most common. Those gardeners who treat plants with fungicides in autumn and spring do believe that they never get sick.
Conclusion
Clematis Tudor is a low vine with large bright flowers. It is highly decorative. Requires shelter and light pruning in autumn. The plant is unpretentious in care, tolerates frost well and rarely gets sick.