


Contents
Technical rooms are difficult to put in order: too contradictory requirements must be combined in finishing materials. They should be practical and beautiful, while they should not be afraid of water, high humidity. And it is also very desirable that they are simply mounted and inexpensive. Agree, it is not at all easy to find a material suitable for these requirements. One option is an aluminum rack ceiling. If you need to update the ceiling in the bathroom, toilet, hallway, balcony or kitchen, take a closer look at this system.
Rack ceiling device and its types
Like any suspension system, the aluminum slatted ceiling is mounted below the floor level, so the initial state of the rough ceiling is unimportant. It consists of a system of suspensions, to which the supporting profiles are attached. These profiles have special recesses for fixing aluminum strips, which form the front surface of the ceiling.
The appearance of the aluminum ceiling depends on the type of slats. They are made of thin-walled aluminum, then painted, covered with a protective layer of varnish. Color – any of the RAL palette. The most common is white and its shades, beige. They are usually in stock, other colors are on order. When choosing a color, you can also choose the type of surface – matte, semi-gloss, glossy.
Reiki can be of different widths and shapes. Width – from 90 mm to 200 mm. The front surface of the bar can be flat (German and Russian), rounded (Italian). There are also triangular in cross section, but they are rarely used in apartments. Separately, it is worth mentioning the perforated slats. They are good for ventilation, but the look is too official for an apartment or house.
According to the method of fastening, an aluminum suspended ceiling can be:
- Open. In this case, the slats are attached so that there is some distance between them. The gap can be closed with a special slot profile (most often it is of a different color).
- Closed. Planks are attached close to each other.
It looks like a slatted suspended ceiling
The most common open version. The gaps are closed with slats of a different color, but you can pick up the same one. There is another option – a bar with a board. When used, gaps close immediately. In private houses and apartments, the scope of such ceilings is the bathroom, toilet and kitchen.
System components
Aluminum rack ceiling consists of:
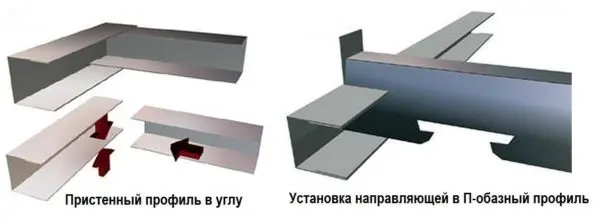
- Wall profile. It can be L-shaped or U-shaped. It is selected to match the slats or slotted profile.
- Stringer (bearing profile). This is a profile made of stainless steel or galvanized steel with special recesses for attaching the slats. The size is selected according to the width of the slats.

Elements of a slatted false ceiling - Hangers. Hangers can be used for any suspended ceilings. The most popular with two studs, as they are inexpensive, easy to mount and allow you to quickly adjust the height. Instead of hangers, you can use a long self-tapping screw (if the ceiling is hemmed with a board or a wooden floor) or dowel-nails (installed in concrete). This option allows you to “take away” a minimum height from the room, even attach it closely.

Hangers can be any - Aluminum slats in selected widths and shapes. Metal thickness from 0,3 mm to 0,6 mm. Even the thinnest one is suitable for installing a slatted ceiling in the kitchen or bathroom – due to the stiffening ribs, it will not sag in small rooms.
- Slot profile (insert) – close the gap between the slats. Installed after the slats are fixed, held by the curly edge
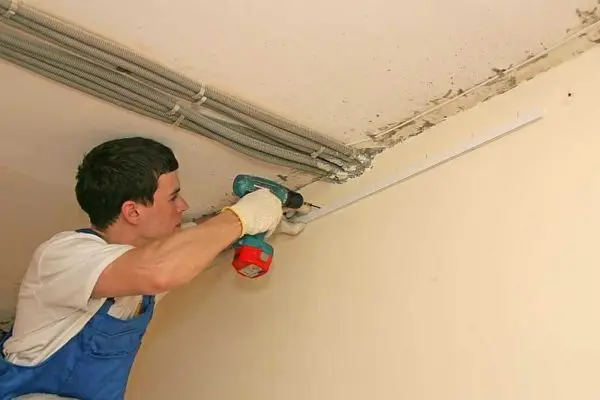
It is possible to assemble an aluminum rack ceiling in a bathroom or kitchen in a few hours. Everything is simple, the most complex operations are the installation of fasteners, cutting rails and profiles into segments of the desired length.
In addition to these components, you will need to take care of lighting. The most commonly used spotlights. Under them, holes are cut in the rails. Chandeliers can also be used, but the fastening will need to be thought out independently.
Release forms and prices
There are two forms of production of aluminum slatted ceilings: all components individually or in a set. The kit is designed for certain sizes, everything you need is included in the kit. There may be no suspensions, as the height of the ceiling may be different. If you want to make a metal suspended ceiling in a typical bathroom or kitchen, it is quite possible to find the set you need. The downside of this solution is a small selection of colors.
| Purpose and size | Brand name | Rail width | Color | Price |
|---|---|---|---|---|
| Universal set 2500*1500 | cease | 100 mm | light pink | 2800 rub |
| Bathroom set 1700*1700 | cease | 150 mm | white marble | 3000 rub |
| Bathroom set 1700*1700 | cease | 150 mm | mosaic | 3600 rub |
| Set of rack ceilings for a toilet 1330*900 | Mospotolki | 85 mm | white matt | 1800 rub |
If you buy accessories for the rack ceiling on your own, the choice is much wider. The standard rail length is 6 m, but four and five meters are found. The price depends on the width of the bar, the type of profile, the thickness of the metal, the length and color. The cheapest are white flat ones. They cost from 45 rubles per linear meter (with a width of 100 mm). The price of painted “under the tree” – from 100 rubles / m with a width of 100 mm. The most expensive are chrome. For them, you will have to pay 260 rubles / m or more (with the same width).
The rest of the accessories cost quite a bit:
- guides – 150-180 rubles per 4 m;
- insert – from 56 to 360 rubles per 4 m;
In general, if you need a way to quickly and inexpensively tidy up the ceiling in the bathroom or kitchen, you need an aluminum slatted ceiling.
Installation tools
To install a metal rack ceiling, you need simple tools:
- Drill with a set of drills and a crown for cutting holes for installing spotlights.
- Shears for metal or angle grinder with a small diamond blade – cut rails and profiles.
- Screwdriver or screwdriver.
- Water level or level – for marking the level of a suspended ceiling.
- A marker or pencil. It is better to draw on the tile with a dark felt-tip pen. It is easier to see and easier to clean. On painted walls, it is better to use a simple pencil or white chalk.
- Roulette.

Metal slatted ceiling – a great choice for a bathroom or kitchen
A few clarifications about the tool. Drills are needed to install dowels, select the size accordingly. If the walls are tiled, tile drills are needed. After holes are made in ceramics, the drill should be changed – to one that is intended for concrete work.
A crown is not a mandatory tool, but it is easier to work with. If there is no crown of a suitable size, you can cut a hole with metal scissors: first make a small hole in the center, then cut the desired size in a spiral.
The installation process
First of all, you need to decide on the level of the false ceiling. If there are no other restrictions, take into account the height of the recessed luminaires that you are going to install: the height of the luminaire + 3-5 cm. Next, the actual installation begins.
Wall profile installation
We begin to mount the aluminum rack ceiling by marking the walls – we need to draw a line along which we will align the rails. The easiest way to do this is to use a laser plane builder (level), if it is not there, you will have to transfer the mark with a water level.
Along the intended line, it will be necessary to fasten the wall profile. There are two types – L-shaped and U-shaped. It is easier to work with the first one, and when installing the second one, it will be possible to tightly fix the stringer due to the linings. So the choice is yours.
The wall profile is cut into pieces of the desired length – along the width and length of the toilet, bath or kitchen. We apply the cut piece to the drawn line, on it we mark the installation locations of the fasteners. We put one dowel at the edges, then after 40-50 cm. If there are tiles on the walls, the fasteners should fall in its middle, so we focus more on this, and not on the distance.
We drill holes in the bar according to the marks, again we put the profile in place. This time, through the holes made, we make marks on the wall. We drill, install plastic dowels. They should be flush with the wall surface. In order not to damage the tile when hammering, you can hammer the dowel through a wooden block. After installing the dowels, we fix the wall profile. Cut corners neatly. It can be done at 45 °, or it can be done neatly under a straight line.
Installation of stringers
Stringers (guides) are mounted so that their edges go into the installed wall profile. In length, they are 1 cm shorter than the distance between the walls – so that they do not rub or creak. The wall profile will not bear any load. All the weight will be taken by suspensions and stirrers.
The step between the guides is no more than 1,2 m, the installation of suspensions is 30 cm from the wall, between the suspensions is 120 cm. We fill the stringer into the profile, take the selected suspension system, install them through the selected distance.

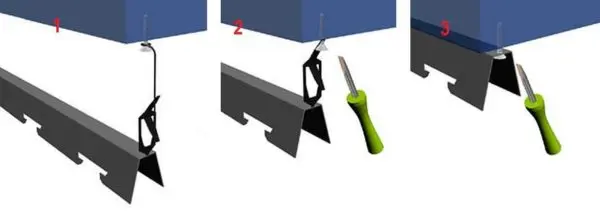
Some ways of attaching the springer to the ceiling are shown in the figure above. The suspension can be not only this – any chosen by you. The first option is suitable if you need to lower the ceiling to a considerable height. In this case, the height is adjusted using a spring. In the second and third cases, the height is adjusted by screwing in / unscrewing the self-tapping screw or dowel. It is clear that the adjustment limit will be much less, but it depends on the length of the self-tapping screw (you can choose a long one).
If the guide is installed in a U-shaped wall profile, a small section of the upper shelf must be cut out on it and bent upwards. Otherwise, the stringer simply will not. When using an L-shaped profile, there is no such problem.

Installed guides should be approximately at the same level. If a spring is used for adjustment, it is necessary to set the plane at this stage, if self-tapping screws or dowels, it is possible after installing the rails. The plane is controlled by a bubble building level or a level.
Installation of rails
Next, we actually begin to assemble the aluminum rack ceiling. We release the planks from the protective film (it can be white or transparent and then you can not notice it), cut into pieces of the desired length. Length – 0,5-0,8 cm less than the distance between the walls. It is not worth cutting many planks at once – rooms with ideal geometry are rare. You can cut 2-3-4 pieces at a time.
You can cut with scissors for metal or a diamond blade on a grinder. If you work with scissors, cut the bar along the mark from the edges, draw something sharp along the cut line, bend along this line. The rack usually breaks. But at the same time, the edge is not very even. It will be smoother if you cut with scissors or a grinder.
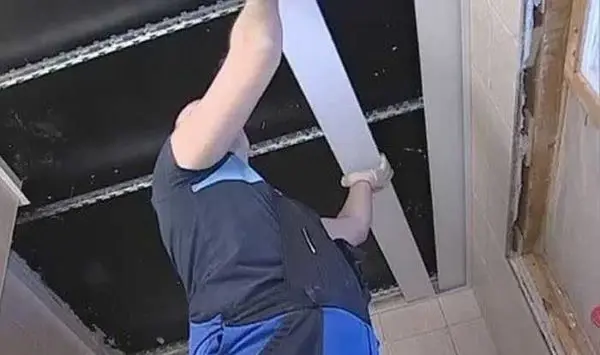
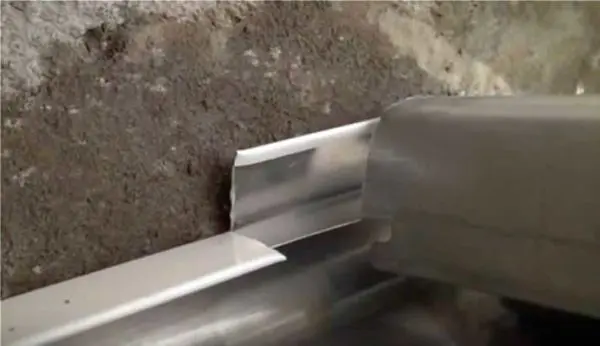
The first rail is usually placed at the door opposite the entrance. It is brought in at one end into the wall profile, having turned slightly, the second one is turned on from the other side. Move to the installation site. At the same time, it must be pulled down a little so that the grooves on the stringers do not cling. Having pushed into place, the bar is pressed up until it clicks – the protrusions on the bar go into the cutouts on the guide. We check all connections. In the same way, we put other slats, only the last bar usually has to be cut. You can draw a line along, make cuts perpendicular to it and cut it into pieces. It’s easier.
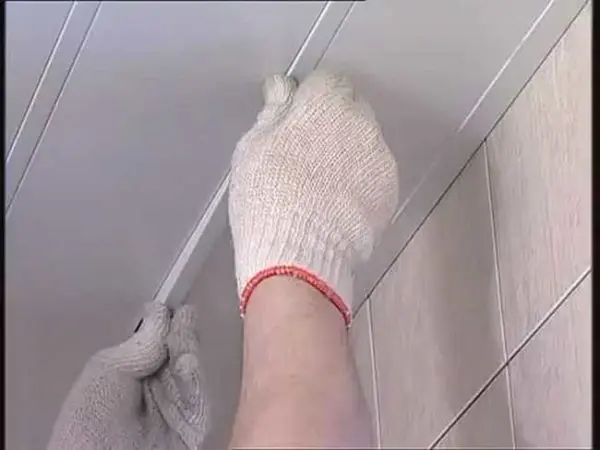
After all the rails are installed, you can check the plane of the ceiling (if you didn’t do this when installing the rails and use long self-tapping screws). Do this with a screwdriver inserted into the gap between the slats – tighten / unscrew the screws. The last step in the installation of an aluminum rack ceiling is the installation of inserts (slotted profile). It is cut into pieces of the same length as the slats, and the edges are also brought into the wall profile. Then they lead into the groove with one edge. At the same time, with its protrusion, the insert clings to the edge of the bar. The second edge is simply pressed until it clicks. We check the connection along the entire length, where necessary – we correct it.